Hexo 是一个快速、简洁且高效的静态博客框架,它基于Node.js运行,搭建过程中还需要使用npm(Node.js 自带)和Git,因此先需要搭建本地操作环境。
在Node.js 官网 选择 LTS 长期维护版本进行下载,安装完成后通过以下指令检测是否安装成功。
安装好Node.js后,会自带 npm。由于该npm的镜像源默认是在国外的,在安装插件时有时会很慢,这时可以通过如下指令更换镜像源。
1 2 3 4 5 6 7 8 npm config set registry https://registry.npm.taobao.org npm config get registry npm config delete registry
Git 详细安装 Node.js 安装教程(详解 Git 安装过程的每一个步骤)
首先给出官方网址: Hexo 官网
首先需要建立一个空文件夹,尽量非系统盘,比如~D:/Hexo/,以后都指代为根目录。
使用npm安装Hexo,在根目录路径下右键->Git Bash Here,输入
1 2 3 4 5 6 7 8 9 10 11 12 13 14 15 16 17 18 19 20 npm config set registry https://registry.npmmirror.com npm install hexo-cli -g hexo init hexo cl hexo g hexo s
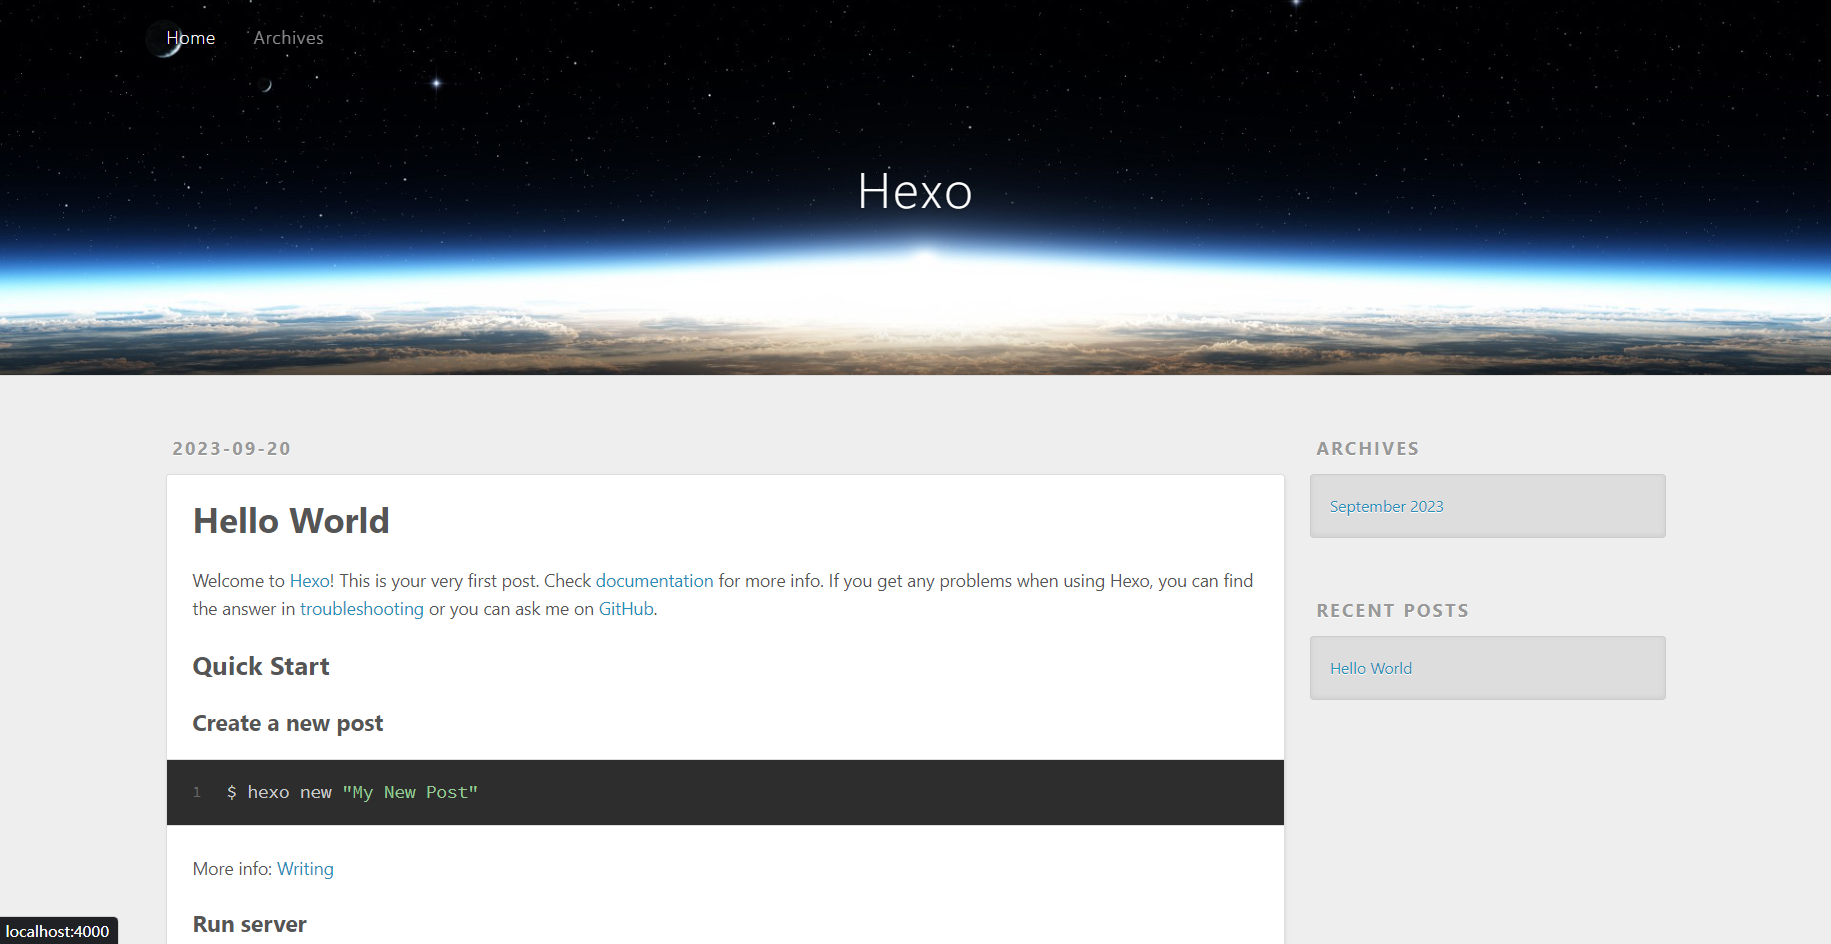
在浏览器打开localhost:4000,就能看到
如果你安装了hexo-admin插件,就可以通过访问localhost:4000/admin来管理你的文章了,并且在可视化界面中操作文章内容。
1 2 npm install hexo-admin --save
注册Github 账号
新建username.github.io仓库
注册成功后,在 github 首页单击头像->Your repositories,在自己的 GitHub 账号下创建一个新的仓库,命名为 username.github.io(username 是你的账号名)。
配置 Git 和 Github
这一步骤推荐在git bash中运行指令。若使用powershell或cmd,less指令缺少必要的 C 语言环境,需要访问C:\Users\Username\.ssh\id_rsa.pub复制。
在个人github网页单击头像->settings,在设置页面找到SSH and GPG keys,单击New SSH key将刚刚复制的 Key 粘贴过来新建SSH KEY。
保存后,在 git bash 测试 sshkey 是否添加成功,输入
正常输出是
1 2 3 4 5 The authenticity of host 'github.com (207.97.227.239)' can't be established. RSA key fingerprint is 16:27:ac:a5:76:28:2d:36:63:1b:56:4d:eb:df:a6:48. Are you sure you want to continue connecting (yes/no)? # 此处请输入yes Hi username! You' ve successfully authenticated, but GitHub does not provide shell access.
配置过程中可能遇到的 bug
如果报错为
1 ssh: connect to host gitee.com port 22: Connection timed out
这是由于在当前网络环境中,端口 22 被占用了,可以改用其他端口再试试
配置 hexo 部署插件内容
确保安装了hexo-deployer-git,如果没有,在根目录下右键->Git Bash Here,输入
1 npm install hexo-deployer-git --save
打开根目录的_config.yml,修改底部的deploy配置项。如果没有找到deploy配置项,则自己添加
1 2 3 4 5 6 deploy: type: git repo: [email protected] :username/username.github.io.git branch: main
这里deploy前面不要有空格,而所有:后面都要有空格。对齐缩进情况要严格按照示例来写。yml编译对缩进要求很严格,所以格式很重要。
把本地 Hexo 博客内容提交到git仓库
在根目录右键->Git Bash Here,输入
不出意外,就可以在浏览器上输入https://username.github.io访问你的博客了,记得替换username为自己的用户名。
关于备份的问题,我一般都新建一个私人仓库来备份 hexo 源文件,而且可以用 bat 批处理来一键发布和备份文章
1 start cmd /k "d: && cd Hexo && hexo cl && hexo g && hexo d && git add --all && git commit -m " update posts" && git push"
购买域名
绑定域名
首先要获取博客当前默认域名的IP,打开cmd或者powershell,输入
1 2 ping username.github.io
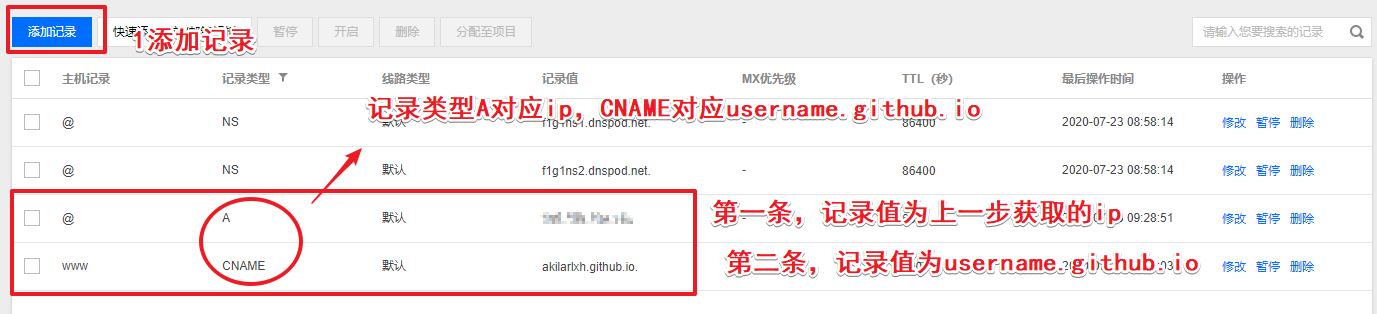
获取到的ip地址填入域名解析
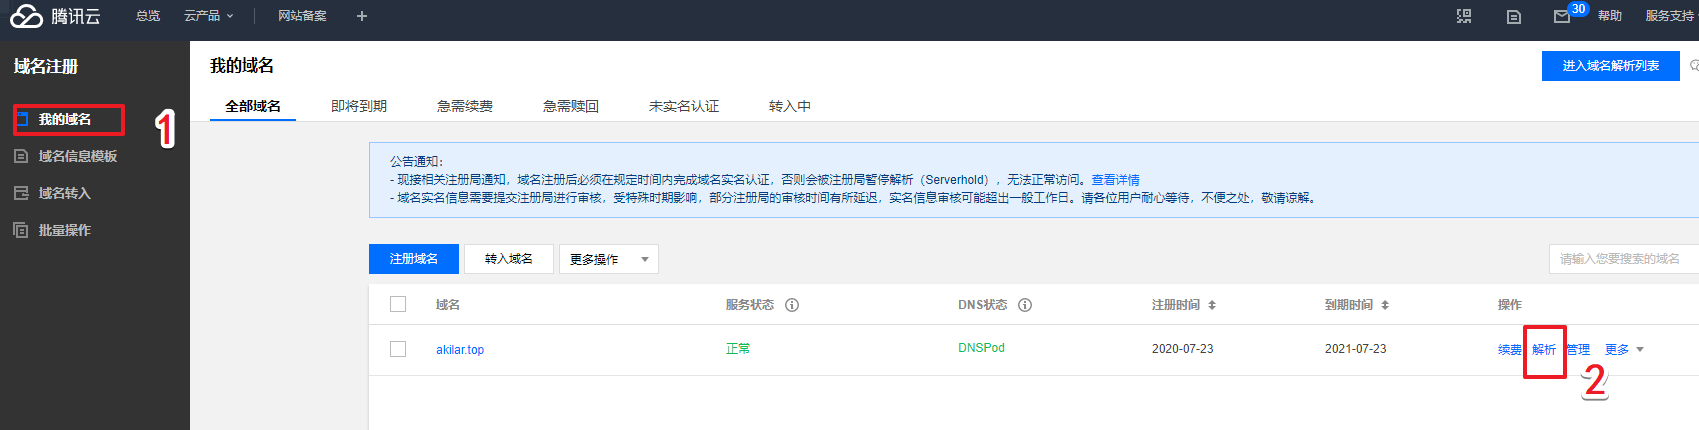
这里以腾讯云为例。进入控制台->域名注册->我的域名。在购买的域名的操作栏选择解析。
进入解析页面后需要添加两条记录。
关于为什么要添加两条记录。此处有必要说明一下,实质起作用的其实是第一条A记录,而第二条CNAME记录指向的其实是www的二级域名。例如此处指向www.akilar.top。然后当有人用www.akilar.top访问时,会重定向到akilar.top。emmm,虽然看起来有点多此一举啦,但是听说这样可以提升访问成功几率。毕竟很多人习惯在域名前面敲个www。
在根目录\source\下新建CNAME文件(注意不要有后缀名,就叫CNAME即可,什么.txt、.js之类的后缀都不能有),在CNAME文件中添加上你购买的域名。
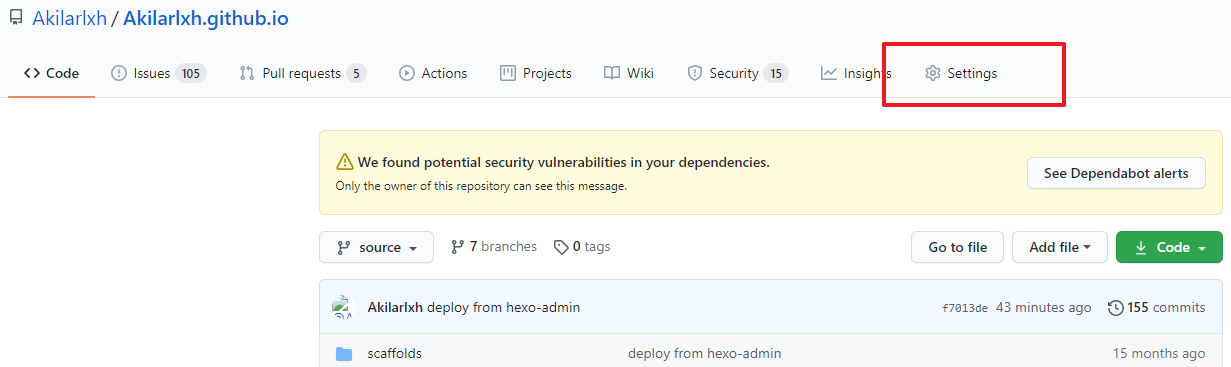
配置username.github.io仓库。
打开username.github.io,点击仓库页面右上角的 setting
最后,重新部署一下
1 2 3 hexo clean hexo generate hexo depoly
即可通过你的域名来访问博客了。
我们主要使用 butterfly 主题的魔改版本安知鱼主题来搭建。首先给出butterfly 的官方文档 和其主题美化教程 ,以及安知鱼主题的官方文档 和安知鱼主题指南 。
在博客根目录里安装最新版【推荐】
1 git clone -b main https://github.com/anzhiyu-c/hexo-theme-anzhiyu.git themes/anzhiyu
如遇安装不上可以使用以下 url 代理安装
1 git clone -b main https://ghproxy.com/https://github.com/anzhiyu-c/hexo-theme-anzhiyu.git themes/anzhiyu
修改 hexo 配置文件_config.yml,把主题改为anzhiyu
1 npm install hexo-renderer-pug hexo-renderer-stylus --save
若无法安装则考虑 cnpm 进行安装
1 npm install hexo-renderer-pug hexo-renderer-stylus --save --registry=http://registry.npmmirror.com
覆盖配置可以使主题配置放置在 anzhiyu 目录之外,避免在更新主题时丢失自定义的配置。
以后如果修改任何主题配置,都只需修改 _config.anzhiyu.yml 的配置即可。
注意:
只要存在于 _config.anzhiyu.yml 的配置都是高优先级,修改原 _config.yml 是无效的。
每次更新主题可能存在配置变更,请注意更新说明,可能需要手动对 _config.anzhiyu.yml 同步修改。
想查看覆盖配置有没有生效,可以通过 hexo g --debug 查看命令行输出。
如果想将某些配置覆盖为空,注意不要把主键删掉,不然是无法覆盖的
此时就能在http://localhost:4000 看到效果了。
适用于通过 Github 或 Release 压缩包主题,且没有自行修改任何代码的情况。
先将原文件夹重命名为别的名称,例如 anzhiyu-bkp,用于升级失败进行回退。
选择自己的安装方式升级。
Github:重新重新执行安装命令即可
1 git clone -b main https://github.com/anzhiyu-c/hexo-theme-anzhiyu.git themes/anzhiyu
Release:按照安装步骤,下载 release 并解压重命名为 anzhiyu
比对升级后的配置文件_config.yml,如果某些配置发生了变化(改名或弃用),release 的说明里会特别提示或给出配置文件版本对比 diff,同步修改原配置文件即可。
主题配置文件中开启menu中标签页的注释,注意缩进!!!
1 2 3 4 5 6 7 8 9 10 11 12 13 14 15 16 17 18 19 20 21 menu: 文章: 隧道: /archives/ || anzhiyu-icon-box-archive 分类: /categories/ || anzhiyu-icon-shapes 标签: /tags/ || anzhiyu-icon-tags 友链: 友人帐: /link/ || anzhiyu-icon-link 朋友圈: /fcircle/ || anzhiyu-icon-artstation 留言板: /comments/ || anzhiyu-icon-envelope 我的: 音乐馆: /music/ || anzhiyu-icon-music 追番页: /bangumis/ || anzhiyu-icon-bilibili 相册集: /album/ || anzhiyu-icon-images 小空调: /air-conditioner/ || anzhiyu-icon-fan 关于: 关于本人: /about/ || anzhiyu-icon-paper-plane 闲言碎语: /essay/ || anzhiyu-icon-lightbulb 随便逛逛: javascript:toRandomPost() || anzhiyu-icon-shoe-prints1
在 Hexo 博客根目录下打开终端,输入
找到 source/tags/index.md 这个文件并修改,添加type: "tags"
1 2 3 4 5 6 7 8 9 --- title: 标签 date: 2023-09-20 16:02:53 type: "tags" comments: false top_img: false orderby: name order: 1 ---
参数
解释
type
【必须】页面类型,必须为 tags
comments
【可选】是否显示评论
top_img
【可选】是否显示顶部图
orderby
【可选】排序方式 :random/name/length
order
【可选】排序次序: 1, asc for ascending; -1, desc for descending
在 Hexo 博客根目录下打开终端,输入
1 hexo new page categories
找到 source/categories/index.md 这个文件并修改,添加type: "categories"
1 2 3 4 5 6 7 --- title: 分类 date: 2023-09-20 16:13:51 aside: false top_img: false type: "categories" ---
自定义分类页面
首先去除source/categories/index.md文件中的type: "categories"
修改source/categories/index.md文件,具体内容可自行修改链接与文字
1 2 3 4 5 6 7 8 9 10 11 12 13 14 15 16 17 18 19 20 21 22 23 24 25 26 27 28 29 30 31 32 33 34 35 36 37 38 39 40 41 42 43 44 45 --- title: 分类 date: 2023-09-20 16:13:51 aside: false top_img: false # type: categories --- <style > #libCategories .card-wrap:hover .card-info:after { width: 300%; } </style > <link rel ="stylesheet" type ="text/css" href ="https://npm.elemecdn.com/[email protected] /3dCard/no3d.css" > <div id ='libCategories' > <div id ="lib-cards" class ="container" > <a href ='javascript:void(0);' onClick ='pjax.loadUrl("/categories/学习/")' > <card data-image ="https://cdn.jsdelivr.net/npm/xiansakana-blog-img/202309232121154.jpg" > <h1 slot ="header" > </h1 > <p slot ="content" > </p > </card > </a > <a href ='javascript:void(0);' onClick ='pjax.loadUrl("/categories/游戏/")' > <card data-image ="https://cdn.jsdelivr.net/npm/xiansakana-blog-img/202309232100891.jpg" > <h1 slot="header">游戏</h1> <p slot="content">各种游戏记录。</p> </card > </a > <a href ='javascript:void(0);' onClick ='pjax.loadUrl("/categories/生活/")' > <card data-image ="https://cdn.jsdelivr.net/npm/xiansakana-blog-img/202309232116463.jpg" > <h1 slot="header">生活</h1> <p slot="content">和好朋友👬们一起经历的有趣事。</p> </card > </a > </div > </div > <script src ='https://lf6-cdn-tos.bytecdntp.com/cdn/expire-1-M/vue/2.6.14/vue.min.js' data-pjax > </script > <script type ="text/javascript" src ="https://npm.elemecdn.com/[email protected] /no3d/no3d.js" data-pjax > </script >
在 Hexo 博客根目录下打开终端,输入
找到 source/essay/index.md 这个文件并修改,添加type: "essay"
1 2 3 4 5 6 7 8 --- title: 说说 date: 2023-09-20 16:38:41 comments: true aside: false top_img: false type: essay ---
添加数据,新建文件[blog]\source\_data\essay.yml,没有_data文件夹的话也请自己新建。以下是默认格式示例,打开source\_data\essay.yml,输入
1 2 3 4 5 6 7 8 9 10 11 12 13 14 15 16 17 18 19 20 21 22 23 24 25 26 27 28 29 30 31 32 33 34 35 36 37 38 39 40 41 42 43 44 45 46 47 48 49 50 51 52 53 54 55 56 57 58 - title: 说说 subTitle: 咸鱼的日常生活。 tips: 随时随地,分享生活 buttonText: 关于我 buttonLink: /about/ limit: 1000 home_essay: true top_background: https://cdn.jsdelivr.net/npm/xiansakana-blog-img/202309232138720.png essay_list: - content: 终于写完作业了,好困,明天有时间再想办法继续弄这个网站吧,毕竟还有很多细节需要慢慢配置。 date: 2023 -09 -22 - content: 今天把Hexo建站的笔记写了大半了,明天看看能不能写完,不过好像database明天有个作业要due了,好烦。 date: 2023 -09 -20
在 Hexo 博客根目录下打开终端,输入
找到 source/link/index.md 这个文件并修改,添加type: "link"
1 2 3 4 5 --- title: 友链 date: 2023-09-20 17:00:15 type: "link" ---
新建文件source\_data\link.yml,没有_data文件夹的话也请自己新建。以下是默认友链格式示例。打开[blog]\source\_data\link.yml,输入
1 2 3 4 5 6 7 8 9 10 11 12 13 14 15 16 17 18 19 20 21 22 23 24 25 26 27 28 29 30 31 32 33 - class_name: 框架 flink_style: flexcard link_list: - name: Hexo hundredSuffix: "" link: https://hexo.io/zh-tw/ avatar: https://d33wubrfki0l68.cloudfront.net/6657ba50e702d84afb32fe846bed54fba1a77add/827ae/logo.svg descr: 快速、简单且强大的网站框架 - name: anzhiyu主题 link: https://blog.anheyu.com/ avatar: https://img02.anheyu.com/adminuploads/1/2022/09/15/63232b7d91d22.jpg descr: 生活明朗,万物可爱 siteshot: https://npm.elemecdn.com/[email protected] /img/post/common/anzhiy.cn.jpg - class_name: 推荐博客 flink_style: flexcard link_list: - name: 安知鱼 hundredSuffix: "" link: https://blog.anheyu.com/ avatar: https://img02.anheyu.com/adminuploads/1/2022/09/15/63232b7d91d22.jpg descr: 生活明朗,万物可爱 siteshot: https://npm.elemecdn.com/[email protected] /img/post/common/anzhiy.cn.jpg - class_name: 小伙伴 class_desc: 那些人,那些事 flink_style: anzhiyu link_list: - name: 安知鱼 hundredSuffix: "" link: https://blog.anheyu.com avatar: https://img02.anheyu.com/adminuploads/1/2022/09/15/63232b7d91d22.jpg descr: 生活明朗,万物可爱
参数
解释
class_name
【必填】友链分类名
class_desc
【可选】友链分类描述
flink_style
【必填】flexcard或者anzhiyu或者telescopic
hundredSuffix
【可选】解决共同进步板块头像质量问题,配置后共同进步板块的头像会添加该后缀(请确保你的图片加上 hundredSuffix 的配置后依然可以访问)。 例如:hundredSuffix: "!w120"
link_list
【必须】友链列表
link_list.name
【必须】友链名称
link_list.link
【必须】友链链接
link_list.avatar
【必须】友链头像
link_list.descr
【必须】友链描述
link_list.siteshot
【可选】flink_style 为 flexcard 或 telescopic 时友链的站点图片
link_list.recommend
【可选】快捷选项,等于color:"" + tag: "荐"
link_list.tag
【可选】左上角的 tag,为当前友链打上标签 例如:“推荐”
link_list.color
【可选】tag 的十六进制背景颜色例如: “#646cff”,提供了两个快捷颜色选项分别是vip和speed
当友链数目超过 50 以后会触发,与博主共同进步板块,可以自行配置 hundredSuffix: "!w120",该参数可以解决共同进步板块头像质量问题,配置后共同进步板块的头像会添加该后缀。
与数百博主共同进步 :
在主题配置文件中_config.anzhiyu.yml中配置
1 2 3 4 5 6 linkPageTop: enable: true title: 与数百名博主无限进步 addFriendPlaceholder: "昵称(请勿包含博客等字样):\n网站地址(要求博客地址,请勿提交个人主页):\n头像图片url(请提供尽可能清晰的图片,我会上传到我自己的图床):\n描述:\n站点截图(可选):\n"
在 Hexo 博客根目录下打开终端,输入
找到 source/about/index.md 这个文件并修改,添加type: "about"
1 2 3 4 5 6 7 8 9 --- title: 关于 date: 2023-09-20 17:27:52 aside: false top_img: false background: "#f8f9fe" comments: false type: "about" ---
新建source/_data/about.yml,输入以下默认示例内容
1 2 3 4 5 6 7 8 9 10 11 12 13 14 15 16 17 18 19 20 21 22 23 24 25 26 27 28 29 30 31 32 33 34 35 36 37 38 39 40 41 42 43 44 45 46 47 48 49 50 51 52 53 54 55 56 57 58 59 60 61 62 63 64 65 66 67 68 69 70 71 72 73 74 75 76 77 78 79 80 81 82 83 84 85 86 87 88 89 90 91 92 93 94 95 96 97 98 99 100 101 102 103 104 105 106 107 108 109 110 111 112 113 114 115 116 117 118 119 120 121 122 123 124 125 126 127 128 129 130 131 132 133 134 135 136 137 138 - class_name: 关于页 subtitle: 活在当下,及时摸鱼✨ avatarImg: https://cdn.jsdelivr.net/npm/xiansakana-blog-img/202309191709924.jpg name: saltedfish description: 是一条咸鱼 aboutsiteTips: tips: 追求 title1: 源于 title2: 热爱而去 感受 word: - 学习 - 生活 - 二次元 - 游戏 helloAbout: Hello there! skillsTips: tips: 技能 title: 开启创造力 careers: tips: 生涯 title: 无限进步 item: - EDU,计算机工程专业 img: https://cdn.jsdelivr.net/npm/xiansakana-blog-img/202309210156942.gif statistic: link: /archives text: 文章隧道 cover: https://cdn.jsdelivr.net/npm/xiansakana-blog-img/202309201812230.png map: title: 我现在住在 StrengthenTitle: 美国,纽约 background: https://cdn.jsdelivr.net/npm/xiansakana-blog-img/202309192319650.png backgroundDark: https://cdn.jsdelivr.net/npm/xiansakana-blog-img/202309192319650.png selfInfo: selfInfoTips1: 生于 selfInfoContentYear: 2001 selfInfoTips2: 纽约大学 selfInfoContent2: 计算机工程 selfInfoTips3: 现在职业 selfInfoContent3: 苦逼学生👨🎓 personalities: author_name: 物流师 personality_type: ISTJ-T photo_url: https://cdn.jsdelivr.net/npm/xiansakana-blog-img/202309192305203.png personality_img: https://www.16personalities.com/static/images/personality-types/avatars/istj-logistician.svg name_url: https://www.16personalities.com/istj-personality maxim: maxim_tips: 座右铭 maxim_top: 活在当下, maxim_bottom: 及时摸鱼。 buff: buff_tips: 特长 buff_top: 喜欢且擅长摸鱼的 咸鱼 buff_bottom: 二次元指数 MAX game: game_tips: 爱好游戏 game_title: 原神 game_uid: "UID: 185137348" game_bg: https://cdn.jsdelivr.net/npm/xiansakana-blog-img/202309192310493.jpg comic: comic_tips: 爱好番剧 comic_title: 追番 comic_list: - name: 约定的梦幻岛 href: https://www.bilibili.com/bangumi/media/md5267750/?spm_id_from=666.25.b_6d656469615f6d6f64756c65.1 cover: https://bu.dusays.com/2023/05/27/647166c44b414.webp - name: 咒术回战 href: https://www.bilibili.com/bangumi/media/md28229899/?spm_id_from=666.25.b_6d656469615f6d6f64756c65.1 cover: https://bu.dusays.com/2023/05/24/646db4398832e.webp - name: 紫罗兰永恒花园 href: https://www.bilibili.com/bangumi/media/md8892/?spm_id_from=666.25.b_6d656469615f6d6f64756c65.1 cover: https://bu.dusays.com/2023/05/24/646db43983d99.webp - name: 鬼灭之刃 href: https://www.bilibili.com/bangumi/media/md22718131/?spm_id_from=666.25.b_6d656469615f6d6f64756c65.1 cover: https://bu.dusays.com/2023/05/24/646db439856a0.webp - name: JOJO的奇妙冒险 黄金之风 href: https://www.bilibili.com/bangumi/media/md135652/?spm_id_from=666.25.b_6d656469615f6d6f64756c65.1 cover: https://bu.dusays.com/2023/05/30/64760e38d651a.webp like: like_tips: 关注偏好 like_title: 二次元 like_bg: https://cdn.jsdelivr.net/npm/xiansakana-blog-img/202309232100891.jpg like_bottom: Galgame、动漫 music: music_tips: 音乐偏好 music_title: 华语、纯音乐、动漫音乐 music_bg: https://cdn.jsdelivr.net/npm/xiansakana-blog-img/202309192327740.png music_link: /music/?id=444551276&server=netease reward_list: extra: false
参数
备选值/类型
解释
class_name
关于页
【必须】页面类
subtitle
string
【必须】副标题
avatarImg
url
【必须】头像链接
name
string
【必须 作者名称
description
string
【必须】描述
aboutsiteTips
object
【必须】站点关于提示相关配置
aboutsiteTips.tips
string
【必须】站点关于提示性文字
aboutsiteTips.title1
string
【必须】站点关于标题文字 1
aboutsiteTips.title2
string
【必须】站点关于标题文字 2
aboutsiteTips.word
list
【必须】站点关于标题滚动文字
helloAbout
string
【必须】hello 文字
skillsTips
object
【必须】技能相关配置
skillsTips.tips
string
【必须】技能提示文字
skillsTips.title
string
【必须】技能标题
careers
object
【必须】生涯相关配置
careers.tips
string
【必须】生涯提示性文字
careers.title
string
【必须】生涯标题
careers.list
list
【可选】生涯 item
careers.list.desc
string
【可选】生涯 item 描述
careers.list.color
string
【可选】生涯 item 圆圈颜色
careers.img
string
【必须】生涯底部图片
statistic
object
【必须】统计数据相关配置
statistic.link
url
【必须】统计数据按钮前往链接
statistic.text
string
【必须】统计数据按钮文字
map
object
【必须】地图相关配置
map.title
string
【必须】地图标题
map.StrengthenTitle
string
【必须】地图大标题
map.background
url
【必须】地图亮色模式背景
map.backgroundDark
url
【必须】地图暗色模式背景
selfInfo
object
【必须】作者相关信息配置
selfInfo.selfInfoTips1
string
【必须】作者相关提示文字 1
selfInfo.selfInfoContentYear
number
【必须】作者生日年份
selfInfo.selfInfoTips2
string
【必须】作者相关提示文字 2
selfInfo.selfInfoContent2
string
【必须】作者相关内容 2
selfInfo.selfInfoTips3
string
【必须】作者相关提示文字 3
selfInfo.selfInfoContent3
string
【必须】作者相关内容 3
personalities
object
【必须】作者性格相关配置
personalities.author_name
string
【必须】作者性格名称
personalities.personality_type
string
【必须】作者性格类型
personalities.photo_url
url
【必须】作者自拍图片
personalities.personality_img
url
【必须】作者性格表述图片
personalities.name_url
url
【必须】点击性格跳转到链接
maxim
object
【必须】座右铭相关配置
maxim.maxim_tips
string
【必须】座右铭相关提示文字
maxim.maxim_top
string
【必须】座右铭相关顶部文字
maxim.maxim_bottom
string
【必须】座右铭相关底部文字
buff
object
【必须】特长相关配置
buff.buff_tips
string
【必须】特长相关提示文字
buff.buff_top
string
【必须】特长相关顶部文字
buff.buff_bottom
string
【必须】特长相关底部文字
game
object
【必须】爱好游戏相关配置
game.game_tips
string
【必须】爱好游戏提示文字
game.game_title
string
【必须】爱好游戏标题
game.game_uid
string
【必须】爱好游戏 uid
game.game_bg
url
【必须】爱好游戏背景
comic
object
【必须】追番相关配置,需要 5 条数据
comic.comic_tips
string
【必须】追番相关提示文字
comic.comic_title
string
【必须】追番相关标题
comic.comic_list
list
【必须】追番相关列表
comic.comic_list.name
string
【必须】追番 item 名称
comic.comic_list.href
url
【必须】追番 item 链接
comic.comic_list.cover
url
【必须】追番 item 的 cover
like
object
【必须】关注偏好相关配置
like.like_tips
string
【必须】关注偏好配置提示文字
like.like_title
string
【必须】关注偏好配置标题
like.like_bg
url
【必须】关注偏好配置背景
like.like_bottom
string
【必须】关注偏好配置底部文字
music
object
【必须】音乐偏好相关配置
music.music_tips
string
【必须】音乐偏好提示性文字
music.music_title
string
【必须】音乐偏好标题
music.music_bg
url
【必须】音乐偏好背景
music.music_link
url
【必须】音乐偏好按钮链接
reward_list
object
【可选】打赏相关配置,如果不配置将没有打赏模块
reward_list.name
string
【必须】打赏 item 名称
reward_list.amount
number
【必须】打赏 item 金额
reward_list.datatime
Date
【必须】打赏 item 时间
reward_list.suffix
string/元
【可选】打赏 item 后缀(默认元)
在主题配置页面修改51a统计配置。
1 2 3 4 5 LA: enable: true ck: LingQueMonitorID:
在 Hexo 博客根目录下打开终端,输入
找到 source/album/index.md 这个文件并修改,添加type: "album"
1 2 3 4 5 6 7 8 --- title: 相册 date: 2023-09-20 18:22:20 aside: false top_img: false type: "album" top_background: https://cdn.jsdelivr.net/npm/xiansakana-blog-img/202309201832810.jpg ---
新建文件[blog]\source\_data\album.yml,没有_data文件夹的话也请自己新建。打开[blog]\source\_data\album.yml,输入
1 2 3 4 5 6 7 8 9 10 11 12 13 14 15 16 17 18 19 20 21 22 23 24 25 26 27 28 29 30 31 32 33 34 35 36 37 38 39 40 41 42 43 44 45 46 47 48 49 50 51 52 53 54 55 56 - class_name: 记录日常 path_name: /dailyphoto type: 1 description: 生活小美好 cover: https://cdn.jsdelivr.net/npm/xiansakana-blog-img/202309201908167.jpg top_background: https://cdn.jsdelivr.net/npm/xiansakana-blog-img/202309201909596.png rowHeight: 220 lazyload: true btnLazyload: true url: false album_list: - date: 2023 -09 -17 content: 纽约的时报广场。 address: 美国纽约 from: image: - https://cdn.jsdelivr.net/npm/xiansakana-blog-img/202309201859503.JPG - class_name: 精选壁纸 path_name: /wallpaper type: 1 description: 不一定精,但我选了 cover: https://cdn.jsdelivr.net/npm/xiansakana-blog-img/202309201849058.png top_background: https://cdn.jsdelivr.net/npm/xiansakana-blog-img/202309201948620.png rowHeight: 220 lazyload: true btnLazyload: true url: false album_list: - date: 2023 -09 -20 content: 点兔1 image: - https://cdn.jsdelivr.net/npm/xiansakana-blog-img/202309201852668.png - date: 2023 -09 -20 content: 点兔2 image: - https://cdn.jsdelivr.net/npm/xiansakana-blog-img/202309200150263.png - class_name: 文章封面 path_name: /postscover type: 1 description: 文章的封面,康康你的 cover: https://cdn.jsdelivr.net/npm/xiansakana-blog-img/202309201954794.jpg top_background: https://cdn.jsdelivr.net/npm/xiansakana-blog-img/202309201954794.jpg rowHeight: 220 lazyload: true btnLazyload: true url: false album_list: - date: 2023 -09 -20 content: Hexo搭建个人网站 image: - https://xiansakana.oss-cn-beijing.aliyuncs.com/img/202309210911702.png
参数
备选值/类型
解释
class_name
string
【必须】页面类
path_name
url
【必须】当前相册路径
type
number
【必须】当前相册页面样式类型
description
string
【必须】当前相册描述
cover
url
【必须】当前相册 cover 图片
top_background
url
【可选】当前相册顶部 banner 图片,可以不填,主题版本需要 1.4.1 或以上
rowHeight
number
【可选】仅当 type 为 2 时有效,当前相册 rowHeight
limit
number
【可选】仅当 type 为 2 时有效,当前相册 一次懒加载的数量
lazyload
boolean
【可选】仅当 type 为 2 时有效,当前相册 lazyload 是否开启懒加载,默认懒加载为滚动懒加载,type 为 1 时懒加载不可关闭。
btnLazyload
boolean
【可选】仅当 type 为 2 且 lazyload 开启 时有效,当前相册 lazyload 懒加载的方式,默认为滚动懒加载,开启本选项后为按钮点击懒加载。
album_list
list
【必须】当前相册内图片列表
url
url
【可选】仅当 type 为 2 时有效,可以加载远程的 json 数据。
album_list.date
date
【必须】当前图片创建时间
album_list.content
string
【必须】当前图片描述内容
album_list.image
list
【必须】当前图片集,可以多张
album_list.from
string
【可选】当前图片的创建人,未填写则不显示
album_list.address
string
【必须】当前图片地址
由于相册页面需要很多的 page,所以在写数据的时候自行写入路径path_name,示例数据中有三个path_name,所以需要再创建两个页面,注意新建的页面必须与path_name一致。
1 2 3 hexo new page dailyphoto hexo new page wallpaper hexo new page postscover
找到 source/dailyphoto/index.md 和source/wallpaper/index.md以及source/postscover/index.md三个文件,为相册集详情页,需要加上type: "album_detail"。
1 2 3 4 5 6 7 --- title: dailyphoto date: 2023-09-20 19:12:48 aside: false top_img: false type: "album_detail" ---
1 2 3 4 5 6 7 --- title: wallpaper date: 2023-09-20 19:12:58 aside: false top_img: false type: "album_detail" ---
1 2 3 4 5 6 7 --- title: postscover date: 2023-09-20 19:13:07 aside: false top_img: false type: "album_detail" ---
友链朋友圈后端部署文档 项目地址: https://github.com/Rock-Candy-Tea/hexo-circle-of-friends
请注意朋友圈部署有一定难度,博主使用的为 server 部署,拉取后端代码后可将代码内的默认值改为自己的站点,theme 改为 common2,注意一定要使用common2,否则将无法拉取到自己的友链。
在 Hexo 博客根目录下打开终端,输入
找到 source/fcircle/index.md 这个文件并修改,添加type: "fcircle"
1 2 3 4 5 6 7 8 --- title: 朋友圈 date: 2023-09-20 20:19:40 comments: false aside: false top_img: false type: "fcircle" ---
主题配置文件中开启friends_vue.enable,自行设置朋友圈后端地址和顶部模块背景,注意缩进!!!
1 2 3 4 5 6 friends_vue: enable: false vue_js: https://npm.elemecdn.com/[email protected] /friends/index.f9a2b8d2.js apiurl: top_background:
参数
备选值/类型
解释
enable
boolean
【必须】是否启用
vue_js
url
【必须】朋友圈前端构建后的 url
apiurl
string
【必须】朋友圈后端 url
top_background
url
【可选】朋友圈顶部背景图
其中vue_js参数,可以将https://npm.elemecdn.com/[email protected] /friends/index.f9a2b8d2.js下载下来后将其中的 friends.anheyu.com替换为您的后端 url 然后上传至您的存储端以 url 的形式使用。
原前端项目地址:hexo-circle-of-friends-front ,也可以自行下载项目后,修改代码中的 url 变量路径friends.anheyu.com为你自己的,然后执行npm run build构建使用,
注意
朋友圈后端爬取需使用common2,否则无法爬取到友链数据。
在 Hexo 博客根目录下打开终端,输入
找到 source/music/index.md 这个文件并修改,添加type: "music"
1
2
3
4
5
6
7
8
9
--- title: 音乐 date: 2023-09-20 20:43:19 type: "music" aplayer: true top_img: false comments: false aside: false ---
hexo 配置文件_config.yml中添加以下配置,注意不是主题配置文件
1 2 3 4 5 aplayer: meting: true asset_inject: false
将menu中音乐馆的路径修改为以下格式即可/music/?id=444551276&server=netease,支持id和server参数。id 与 server 的填写请参考MetingJS 。
1 2 3 4 5 6 7 8 9 10 11 12 13 14 15 16 17 18 19 20 21 menu: 文章: 隧道: /archives/ || anzhiyu-icon-box-archive 分类: /categories/ || anzhiyu-icon-shapes 标签: /tags/ || anzhiyu-icon-tags 友链: 友人帐: /link/ || anzhiyu-icon-link 朋友圈: /fcircle/ || anzhiyu-icon-artstation 留言板: /comments/ || anzhiyu-icon-envelope 我的: 音乐馆: /music/?id=444551276&server=netease || anzhiyu-icon-music 追番页: /bangumis/ || anzhiyu-icon-bilibili 相册集: /album/ || anzhiyu-icon-images 小空调: /air-conditioner/ || anzhiyu-icon-fan 关于: 关于本人: /about/ || anzhiyu-icon-paper-plane 闲言碎语: /essay/ || anzhiyu-icon-lightbulb 随便逛逛: javascript:toRandomPost() || anzhiyu-icon-shoe-prints1
主题内置了一个简单的 404 页面,可在主题配置文件中开启,background 可自行设置。
本地预览时,访问出错的网站是不会跳到 404 页面的。 如需本地预览,请访问 http://localhost:4000/404.html
1 2 3 4 5 error_404: enable: true subtitle: "Page Not Found" background: https://cdn.jsdelivr.net/npm/xiansakana-blog-img/202309202100487.jpg
参考链接:https://github.com/HCLonely/hexo-bilibili-bangumi
在博客根目录执行
1 npm install hexo-bilibili-bangumi --save
在 hexo 配置文件_config.yml中加入以下配置,注意不是主题配置文件,更多配置请参考hexo-bilibili-bangumi 。
1 2 3 4 5 6 7 8 9 10 11 12 13 14 15 16 17 18 19 20 21 22 23 24 25 26 bangumi: enable: true source: bili path: vmid: 378412924 title: "追番列表" quote: "生命不息,追番不止!" show: 1 lazyload: false loading: showMyComment: false pagination: false metaColor: color: webp: progress: extraOrder: proxy: host: "代理host" port: "代理端口" extra_options: top_img: false lazyload: enable: false
注意
在hexo generate或hexo deploy之前使用hexo bangumi -u命令更新追番数据,使用hexo cinema -u命令更新追剧数据!
删除数据命令:hexo bangumi -d/hexo cinema -d
在博客根目录执行
1 npm install hexo-butterfly-envelope --save
在站点配置文件_config.yml 中添加以下内容配置,更多配置请查看信笺样式留言板 。
1 2 3 4 5 6 7 8 9 10 11 12 13 14 15 16 17 18 19 20 21 22 envelope_comment: enable: true custom_pic: cover: https://npm.elemecdn.com/hexo-butterfly-envelope/lib/violet.jpg line: https://npm.elemecdn.com/hexo-butterfly-envelope/lib/line.png beforeimg: https://npm.elemecdn.com/hexo-butterfly-envelope/lib/before.png afterimg: https://npm.elemecdn.com/hexo-butterfly-envelope/lib/after.png message: - 有什么想问的? - 有什么想说的? - 有什么想吐槽的? - 哪怕是有什么想吃的,都可以告诉我哦~ bottom: 自动书记人偶竭诚为您服务! height: path: front_matter: title: 留言板 comments: true top_img: false type: envelope
Front-matter 是 markdown 文件最上方以 --- 分隔的区域,用于指定个别档案的变数。其中又分为两种 markdown 里
Page Front-matter 用于页面配置
Post Front-matter 用于文章页配置
如果标注可选的参数,可根据自己需要添加,不用全部都写在 markdown 里
Page Front-matter
1 2 3 4 5 6 7 8 9 10 11 12 13 title: date: updated: type: comments: description: keywords: top_img: mathjax: katex: aside: aplayer: highlight_shrink:
写法
解释
title
【必需】页面标题
date
【必需】页面创建日期
type
【必需】标签、分类、关于、音乐馆、友情链接、相册、相册详情、朋友圈、即刻页面需要配置
updated
【可选】页面更新日期
description
【可选】页面描述
keywords
【可选】页面关键字
comments
【可选】显示页面评论模块(默认 true)
top_img
【可选】页面顶部图片
mathjax
【可选】显示 mathjax(当设置 mathjax 的 per_page: false 时,才需要配置,默认 false)
katex
【可选】显示 katex(当设置 katex 的 per_page: false 时,才需要配置,默认 false)
aside
【可选】显示侧边栏 (默认 true)
aplayer
【可选】在需要的页面加载 aplayer 的 js 和 css,请参考文章下面的音乐 配置
highlight_shrink
【可选】配置代码框是否展开(true/false)(默认为设置中 highlight_shrink 的配置)
Post Front-matter
1 2 3 4 5 6 7 8 9 10 11 12 13 14 15 16 17 18 19 20 21 22 23 24 25 26 title: date: updated: tags: categories: keywords: description: top_img: comments: cover: toc: toc_number: toc_style_ simple: copyright: copyright_author: copyright_author_ href: copyright_url: copyright_info: mathjax: katex: aplayer: highlight_shrink: aside: swiper_index: 1 top_group_ index: 1 background: "#fff"
写法
解释
title
【必需】文章标题
date
【必需】文章创建日期
updated
【可选】文章更新日期
tags
【可选】文章标签
categories
【可选】文章分类
keywords
【可选】文章关键字
description
【可选】文章描述
top_img
【可选】文章顶部图片
cover
【可选】文章缩略图(如果没有设置 top_img,文章页顶部将显示缩略图,可设为 false/图片地址/留空)
comments
【可选】显示文章评论模块(默认 true)
toc
【可选】显示文章 TOC(默认为设置中 toc 的 enable 配置)
toc_number
【可选】显示 toc_number(默认为设置中 toc 的 number 配置)
toc_style_simple
【可选】显示 toc 简洁模式
copyright
【可选】显示文章版权模块(默认为设置中 post_copyright 的 enable 配置)
copyright_author
【可选】文章版权模块的文章作者
copyright_author_href
【可选】文章版权模块的文章作者链接
copyright_url
【可选】文章版权模块的文章链接链接
copyright_info
【可选】文章版权模块的版权声明文字
mathjax
【可选】显示 mathjax(当设置 mathjax 的 per_page: false 时,才需要配置,默认 false)
katex
【可选】显示 katex(当设置 katex 的 per_page: false 时,才需要配置,默认 false)
aplayer
【可选】在需要的页面加载 aplayer 的 js 和 css,请参考文章下面的音乐 配置
highlight_shrink
【可选】配置代码框是否展开(true/false)(默认为设置中 highlight_shrink 的配置)
aside
【可选】显示侧边栏 (默认 true)
swiper_index
【可选】首页轮播图配置 index 索引,数字越小越靠前
top_group_index
【可选】首页右侧卡片组配置, 数字越小越靠前
background
【可选】文章背景可配置为 16 进制颜色值
ai
【可选】文章 ai 摘要
main_color
【可选】文章主色,必须是 16 进制颜色且有 6 位,不可缩减,例如#ffffff 不可写成#fff
首页轮播图配置: swiper_index, 数字越小越靠前
首页卡片配置: top_group_index, 数字越小越靠前
page 中background, 可配置为 16 进制颜色值
只需要在你的文章顶部的Front-matter配置这swiper_index和top_group_index两个字段即可显示轮播图和推荐卡片。
修改网站各种资料,例如标题、副标题和邮箱等个人资料,修改博客根目录的_config.yml,注意如果需要适配 pjax 必须填写description字段,以保证需要重载的 dom 数量一致。语言支持zh-CN (简体中文),zh-TW (繁体中文)和en(English)。
1 2 3 4 5 6 7 title: saltedfish subtitle: "fishpond" description: "这有关于学习、生活、游戏等的各种阿巴阿巴,还有蹩脚的知识和技术。希望这里有能带给你帮助的知识和内容。" keywords: author: saltedfish language: zh-CN timezone: "America/New_York"
修改 主题配置文件
1 2 3 4 5 6 7 8 9 10 11 12 13 14 15 16 17 18 19 20 21 menu: 文章: 隧道: /archives/ || anzhiyu-icon-box-archive 分类: /categories/ || anzhiyu-icon-shapes 标签: /tags/ || anzhiyu-icon-tags 友链: 友人帐: /link/ || anzhiyu-icon-link 朋友圈: /fcircle/ || anzhiyu-icon-artstation 留言板: /comments/ || anzhiyu-icon-envelope 我的: 音乐馆: /music/?id=444551276&server=netease || anzhiyu-icon-music 追番页: /bangumis/ || anzhiyu-icon-bilibili 相册集: /album/ || anzhiyu-icon-images 小空调: /air-conditioner/ || anzhiyu-icon-fan 关于: 关于本人: /about/ || anzhiyu-icon-paper-plane 闲言碎语: /essay/ || anzhiyu-icon-lightbulb 随便逛逛: javascript:toRandomPost() || anzhiyu-icon-shoe-prints1
必须是 /xxx/,后面||分开,然后写图标名。如果不希望显示图标,图标名可不写。
在 主题配置文件
1 2 3 4 5 6 7 8 9 10 11 12 13 14 15 16 nav: enable: true travelling: true clock: true menu: - title: 网页 item: - name: 博客 link: https://xiansakana.xyz icon: https://cdn.jsdelivr.net/npm/xiansakana-blog-img/202309191743806.gif - title: 项目
参数
解释
enable
是否启用 nav 左侧项目按钮,仅控制左侧项目按钮
travelling
是否启用 nav 开往按钮
clock
是否启用 nav 左侧和风天气
menu
nav 左侧项目按钮内的菜单
menu.title
nav 左侧项目按钮内的菜单标题
menu.item
nav 左侧项目按钮内的菜单项
menu.item.name nav 左侧项目按钮内的菜单项标题
menu.item.link
nav 左侧项目按钮内的菜单项链接
menu.item.icon
nav 左侧项目按钮内的菜单项图标
代码块中的所有功能只适用于 Hexo 自带的代码渲染 如果使用第三方的渲染器,不一定会有效
代码高亮主题
AnZhiYu 支持 6 种代码高亮样式:
darker
pale night
light
ocean
mac
mac light
修改 主题配置文件
代码复制
主题支持代码复制功能,修改 主题配置文件
代码框展开/关闭
在默认情况下,代码框自动展开,可设置是否所有代码框都关闭状态,点击>可展开代码
true 全部代码框不展开,需点击>打开
false 代码框展开,有>点击按钮
none 不显示>按钮
修改 主题配置文件
你也可以在 post/page 页对应的 markdown 文件 front-matter 添加 highlight_shrink 来独立配置。
当主题配置文件中的 highlight_shrink 设为 true 时,可在 front-matter 添加 highlight_shrink: false 来单独配置文章展开代码框。
当主题配置文件中的 highlight_shrink 设为 false 时,可在 front-matter 添加 highlight_shrink: true 来单独配置文章收缩代码框。
代码换行
在默认情况下,Hexo 在编译的时候不会实现代码自动换行。如果你不希望在代码块的区域里有横向滚动条的话,那么你可以考虑开启这个功能。
修改 主题配置文件
如果你是使用 highlight 渲染,需要找到你站点的 Hexo 配置文件_config.yml,将 line_number 改成 false:
1 2 3 4 5 highlight: enable: true line_number: false auto_detect: false tab_replace: ""
如果你是使用 prismjs 渲染,需要找到你站点的 Hexo 配置文件_config.yml,将 line_number 改成 false:
1 2 3 4 5 prismjs: enable: false preprocess: true line_number: false tab_replace: ""
代码高度限制
可配置代码高度限制,超出的部分会隐藏,并显示展开按钮,默认 330,可配置为 false。
1 highlight_height_limit: false
注意:
单位是 px,直接添加数字,如 200
实际限制高度为 highlight_height_limit + 30 px ,多增加 30px 限制,目的是避免代码高度只超出 highlight_height_limit 一点时,出现展开按钮,展开没内容
不适用于隐藏后的代码块( css 设置 display: none)
AnZhiYu 支持 阿里图标 (需配置自己的图标),与 font-awesome v6 图标(需开启fontawesome),使用阿里图标需配置主题配置文件中icon.ali_iconfont_js字段,默认内置部分图标,修改主题配置文件,视频教程: 安知鱼主题社交图标配置 。
1 2 3 4 icons: ali_iconfont_js: fontawesome: true fontawesome_animation_css:
使用方法,将图标库中的图标名复制,然后加上前缀anzhiyu-即可,比如icon-github图标,则为anzhiyu-icon-github。
社交图标,书写格式 名称:url || 描述性文字 || icon名称
1 2 3 4 5 6 7 8 9 10 social: Github: https://github.com/xiansakana || anzhiyu-icon-github BiliBili: https://space.bilibili.com/378412924 || anzhiyu-icon-bilibili Email: https://mail.qq.com/cgi-bin/qm_share?t=qm_mailme&[email protected] || anzhiyu-icon-envelope RSS: atom.xml || anzhiyu-icon-rss QQ: tencent://Message/?Uin=2461298052&websiteName=local.edu.com:8888=&Menu=yes || anzhiyu-icon-qq Netease: https://music.163.com/#/user/home?id=319573953 || anzhiyu-icon-music
如果不要显示顶部图,可直接配置 disable_top_img: true
顶部图的获取顺序,如果都没有配置,则不显示顶部图。
页面顶部图的获取顺序:
各自配置的 top_img > 配置文件的 default_top_img
文章页顶部图的获取顺序:
各自配置的 top_img > cover > 配置文件的 default_top_img
配置中的值:
配置
解释
index_img
主页的 top_img,示例值: index_img: “background: url() top / cover no-repeat”
default_top_img
默认的 top_img,当页面的 top_img 没有配置时,会显示 default_top_img
archive_img
归档页面的 top_img
tag_img
tag 子页面 的 默认 top_img
tag_per_img
tag 子页面的 top_img,可配置每个 tag 的 top_img
category_img
category 子页面 的 默认 top_img
category_per_img
category 子页面的 top_img,可配置每个 category 的 top_img
其它页面 (tags/categories/自建页面)和 文章页 的 top_img ,请到对应的 md 页面设置 front-matter 中的 top_img
以上所有的 top_img 可配置以下值
配置的值
效果
留空
显示默认的 top_img(如有),否则显示默认的顔色 (文章页 top_img 留空的话,会显示 cover 的值)
img 链接
图片的链接,显示所配置的图片
顔色( HEX 值 - #0000FF# RGB 值 - rgb(0,0,255) 顔色单词 - orange 渐变色 - linear-gradient( 135deg, #E2B0FF# 10%, #9F44D3# 100%)
对应的顔色
transparent
透明
false
不显示 top_img
文章的 markdown 文档上,在 Front-matter 添加 cover ,并填上要显示的图片地址。
如果不配置 cover,可以设置显示默认的 cover。
如果不想在首页显示 cover, 可以设置为 false。
文章封面的获取顺序 Front-matter 的 cover > 配置文件的 default_cover > false
修改 主题配置文件
1 2 3 4 5 6 7 8 9 10 cover: index_enable: true aside_enable: true archives_enable: true position: both default_cover:
参数
解释
index_enable
主页是否显示文章封面图
aside_enable
侧栏是否显示文章封面图
archives_enable
归档页面是否显示文章封面图
position
主页卡片文章封面的显示位置 - left:全部显示在左边 - right:全部显示在右边 - both:封面位置以左右左右轮流显示
default_cover
默认的 cover, 可配置图片链接/顔色/渐变色等
当配置多张图片时,会随机选择一张作为 cover.此时写法应为
1 2 3 4 default_cover: - https://file.crazywong.com/gh/jerryc127/CDN@latest/cover/default_bg.png - https://file.crazywong.com/gh/jerryc127/CDN@latest/cover/default_bg2.png - https://file.crazywong.com/gh/jerryc127/CDN@latest/cover/default_bg3.png
这个选项是用来显示文章的相关信息的。
修改 主题配置文件
1 2 3 4 5 6 7 8 9 10 11 12 13 14 post_meta: page: date_type: both date_format: date categories: true tags: true label: true post: date_type: both date_format: date categories: true tags: true label: true unread: true
为你的博客文章展示文章版权和许可协议。
修改 主题配置文件
1 2 3 4 5 6 post_copyright: enable: true decode: true author_href: license: CC BY-NC-SA 4.0 license_url: https://creativecommons.org/licenses/by-nc-sa/4.0/
由于 Hexo 4.1 开始,默认对网址进行解码,以至于如果是中文网址,会被解码,可设置 decode: true 来显示中文网址。
如果有文章(例如:转载文章)不需要显示版权,可以在文章 Front-matter 单独设置
支持对单独文章设置版权信息,可以在文章 Front-matter 单独设置
1 2 3 4 copyright_author: xxxx copyright_author_href: https://xxxxxx.com copyright_url: https://xxxxxx.com copyright_info: 此文章版权归xxxxx所有,如有转载,请注明来自原作者
在你每篇文章的结尾,可以添加打赏按钮。相关二维码可以自行配置。
对于没有提供二维码的,可配置一张软件的 icon 图片,然后在 link 上添加相应的打赏链接。用户点击图片就会跳转到链接去。
link 可以不写,会默认为图片的链接。coinAudio 为投币的音频。
修改 主题配置文件
1 2 3 4 5 6 7 8 9 10 11 reward: enable: true coinAudio: https://npm.elemecdn.com/akilar-candyhttps://[email protected] /audio/aowu.m4a QR_code: - img: https://cdn.jsdelivr.net/npm/xiansakana-blog-img/202309192233175.png link: text: 微信 - img: https://cdn.jsdelivr.net/npm/xiansakana-blog-img/202309192233251.png link: text: 支付宝
在文章页,会有一个目录,用于显示 TOC。修改 主题配置文件。
1 2 3 4 5 6 toc: post: true page: true number: true expand: false style_simple: false
属性
解释
post
文章页是否显示 TOC
page
普通页面是否显示 TOC
number
是否显示章节数
expand
是否展开 TOC
style_simple
简洁模式(侧边栏只显示 TOC, 只对文章页有效 )
为特定的文章配置
在你的文章 md 文件的头部,加入 toc_number 和 toc,并配置 true 或者 false 即可。
主题会优先判断文章 Markdown 的 Front-matter 是否有配置,如有,则以 Front-matter 的配置为准。否则,以主题配置文件中的配置为准。
当文章封面设置为 false 时,或者没有获取到封面配置,相关文章背景将会显示主题色。
相关文章推荐的原理是根据文章 tags 的比重来推荐。
修改 主题配置文件
1 2 3 4 related_post: enable: true limit: 6 date_type: created
可设置是否显示文章过期提醒,以更新时间为基准。
1 2 3 4 5 6 7 8 noticeOutdate: enable: true style: flat limit_day: 365 position: top message_prev: It has been message_next: days since the last update, the content of the article may be outdated.
limit_day: 距离更新时间多少天才显示文章过期提醒
message_prev: 天数之前的文字
message_next:天数之后的文字
在文章标题旁边显示一个编辑按钮,点击会跳转到对应的链接去。
1 2 3 4 5 6 7 post_edit: enable: false url:
当文章封面设置为 false 时,或者没有获取到封面配置,分页背景将会显示主题色。
可设置分页的逻辑,也可以关闭分页显示
参数
解释
post_pagination: false
关闭分页按钮
post_pagination: 1
下一篇显示的是旧文章
post_pagination: 2
下一篇显示的是新文章
在主题配置文件中开启功能
1 2 3 4 5 6 7 8 9 10 11 12 13 14 15 16 17 18 19 20 21 22 23 24 25 26 27 28 29 greetingBox: enable: true default: 晚上好👋 list: - greeting: 晚安😴 startTime: 0 endTime: 5 - greeting: 早上好鸭👋, 祝你一天好心情! startTime: 5 endTime: 9 - greeting: 上午好👋, 状态很好,鼓励一下~ startTime: 9 endTime: 11 - greeting: 11 点多啦, 在坚持一下就吃饭啦~ startTime: 11 endTime: 12 - greeting: 午安👋, 宝贝 startTime: 12 endTime: 14 - greeting: 🌈充实的一天辛苦啦! startTime: 14 endTime: 19 - greeting: 19 点喽, 奖励一顿丰盛的大餐吧🍔。 startTime: 19 endTime: 20 - greeting: 晚上好👋, 在属于自己的时间好好放松😌~ startTime: 20 endTime: 24
主题配置文件中,默认为true
当屏幕足够大的时候,就能够显示兴趣点、最近评论、时间归档、功能按键、音乐等内容。
since 是一个来展示你站点起始时间的选项。它位于页面的最底部。
1 2 3 4 5 6 7 8 9 10 11 12 13 14 15 16 17 18 19 20 21 22 23 24 25 26 27 28 29 30 31 32 33 34 footer: owner: enable: true since: 2023 custom_text: runtime: enable: true launch_time: 09 /20/2023 00 :00:00 bdageitem: enable: true list: - link: https://hexo.io/ shields: https://npm.elemecdn.com/[email protected] /img/badge/Frame-Hexo.svg message: 博客框架为Hexo_v5.4.0 - link: https://blog.anheyu.com/ shields: https://npm.elemecdn.com/[email protected] /img/Theme-AnZhiYu-2E67D3.svg message: 本站使用AnZhiYu主题 - link: https://www.dogecloud.com/ shields: https://npm.elemecdn.com/[email protected] /img/badge/CDN-多吉云-3693F3.svg message: 本站使用多吉云为静态资源提供CDN加速 - link: https://github.com/ shields: https://npm.elemecdn.com/[email protected] /img/badge/Source-Github.svg message: 本站项目由Github托管 - link: http://creativecommons.org/licenses/by-nc-sa/4.0/ shields: https://npm.elemecdn.com/[email protected] /img/badge/Copyright-BY-NC-SA.svg message: 本站采用知识共享署名-非商业性使用-相同方式共享4.0国际许可协议进行许可
参数
解释
owner
页脚网站所有者@2020-当前年份
owner.enable
页脚网站所有者是否启用
owner.since
页脚年份,控制台中打印的运行时间也来自这里
runtime
运行时间
runtime.enable
运行时间是否启用
runtime.launch_time
网站上线时间
runtime.work_img
页脚上班时间的徽标
runtime.work_description
页脚上班时间的 title 描述
runtime.offduty_img
页脚下班时间的徽标
runtime.offduty_description
页脚下班时间的 title 描述
bdageitem
徽标配置项
bdageitem.link
徽标配置链接
bdageitem.shields
徽标配置徽标
bdageitem.message
徽标配置徽标 title
socialBar和list用于展示你的社交按钮及站内部分导航,它位于页面的底部。
1 2 3 4 5 6 7 8 9 10 11 12 13 14 15 16 17 18 19 20 21 22 23 24 25 26 27 28 29 30 31 32 33 34 35 36 37 38 39 40 41 42 43 44 45 46 47 48 49 50 51 52 53 54 55 56 57 58 59 60 61 62 63 64 65 66 67 68 socialBar: enable: true centerImg: left: - title: email link: mailto:[email protected] icon: anzhiyu-icon-envelope - title: 微博 link: https://weibo.com/u/5824741493 icon: anzhiyu-icon-weibo - title: facebook link: https://www.facebook.com/profile.php?id=61551327342211&sk=about icon: anzhiyu-icon-facebook1 - title: RSS link: atom.xml icon: anzhiyu-icon-rss right: - title: Github link: https://github.com/xiansakana icon: anzhiyu-icon-github - title: Bilibili link: https://space.bilibili.com/378412924 icon: anzhiyu-icon-bilibili - title: Netease link: https://music.163.com/#/user/home?id=319573953 icon: anzhiyu-icon-music - title: CC link: /copyright icon: anzhiyu-icon-copyright-line list: enable: false randomFriends: 3 project: - title: 服务 links: - title: 51la统计 link: https://v6.51.la/ - title: 十年之约 link: https://www.foreverblog.cn/ - title: 开往 link: https://github.com/travellings-link/travellings - title: 主题 links: - title: 文档 link: /docs/ - title: 源码 link: https://github.com/anzhiyu-c/hexo-theme-anzhiyu - title: 更新日志 link: /update/ - title: 导航 links: - title: 即刻短文 link: /essay/ - title: 友链文章 link: /fcircle/ - title: 留言板 link: /comments/ - title: 协议 links: - title: 隐私协议 link: /privacy/ - title: Cookies link: /cookies/ - title: 版权协议 link: /copyright/
参数
解释
centerImg
页脚社交头像
randomFriends
随机友链数量
footerbar指的是页脚最下面那一栏
1 2 3 4 5 6 7 8 9 10 11 12 13 14 15 16 17 18 19 20 21 22 23 24 25 26 27 28 29 30 31 32 33 footerBar: enable: true authorLink: / cc: enable: true link: /copyright linkList: - link: https://github.com/anzhiyu-c/hexo-theme-anzhiyu text: 主题 subTitle: enable: false effect: true startDelay: 300 typeSpeed: 150 backSpeed: 50 loop: true source: 1 sub:
可自行决定哪个项目需要显示,可决定位置,也可以设置不显示侧边栏。
修改 主题配置文件
1 2 3 4 5 6 7 8 9 10 11 12 13 14 15 16 17 18 19 20 21 22 23 24 25 26 27 28 29 30 31 32 33 34 35 36 37 38 39 40 41 42 43 44 45 46 47 48 49 50 51 52 aside: enable: true hide: false button: true mobile: true position: right display: archive: true tag: true category: true card_author: enable: true description: name_link: / card_announcement: enable: true content: 欢迎来看我的博客鸭~ card_weixin: enable: false face: https://bu.dusays.com/2023/01/13/63c02edf44033.png backFace: https://bu.dusays.com/2023/05/13/645fa415e8694.png card_recent_post: enable: true limit: 0 sort: date sort_order: card_categories: enable: true limit: 0 expand: none sort_order: card_tags: enable: true limit: 0 color: true sort_order: highlightTags: card_archives: enable: true type: monthly format: YYYY MMMM order: -1 limit: 0 sort_order: card_webinfo: enable: true post_count: true last_push_date: true sort_order:
访问 busuanzi 的官方网站 查看更多的介绍。
修改 主题配置文件
1 2 3 4 busuanzi: site_uv: true site_pv: true page_pv: true
如果需要修改 busuanzi 的 CDN 链接,可通过 主题配置文件 的 CDN 中的 option 进行修改
1 2 3 CDN: option: busuanzi: xxxxxxxxx
网页已运行时间
修改 主题配置文件
1 2 3 4 5 runtimeshow: enable: true publish_date: 2023 /9/20 00 :00:00
最新评论只会在刷新时才会去读取,并不会实时变化。
由于 API 有 访问次数限制,为了避免调用太多,主题默认存取期限为 10 分钟。也就是説,调用后资料会存在 localStorage 里,10 分钟内刷新网站只会去 localStorage 读取资料。 10 分钟期限一过,刷新页面时才会去调取 API 读取新的数据。( 配置 storage,可自行配置缓存时间)。
在侧边栏显示最新评论板块
修改 主题配置文件
1 2 3 4 5 6 7 newest_comments: enable: true sort_order: limit: 6 storage: 10 avatar: true
配置
解释
limit
显示的数量
storage
设置缓存时间,单位 分钟
avatar
是否显示头像
简体繁体互换
修改 主题配置文件
1 2 3 4 5 6 7 8 9 10 11 12 13 14 15 16 17 18 19 translate: enable: true default: 繁 rightMenuMsgDefault: "轉為繁體" defaultEncoding: 2 translateDelay: 0 msgToTraditionalChinese: "繁" msgToSimplifiedChinese: "简" rightMenuMsgToTraditionalChinese: "转为繁体" rightMenuMsgToSimplifiedChinese: "转为简体"
阅读模式
阅读模式下会去掉除文章外的内容,避免干扰阅读。
只会出现在文章页面,右下角会有阅读模式按钮。
修改 主题配置文件
夜间模式
右下角会有夜间模式按钮
修改 主题配置文件
1 2 3 4 5 6 7 8 9 10 11 12 13 darkmode: enable: true button: true autoChangeMode: 1 start: end:
参数
解释
button
是否在右下角显示日夜模式切换按钮
autoChangeMode
自动切换的模式
autoChangeMode
autoChangeMode: 1 跟随系统而变化,不支持的浏览器/系统将按照时间 start 到 end 之间切换为 light mode autoChangeMode: 2 只按照时间 start 到 end 之间切换为 light mode ,其余时间为 dark mode autoChangeMode: false 取消自动切换
start
light mode 的开始时间
end
light mode 的结束时间
按钮排序
1 2 3 4 5 6 7 rightside_item_order: enable: false hide: show:
标签外挂是 Hexo 独有的功能,并不是标准的 Markdown 格式。 以下的写法,只适用于 AnZhiYu 主题,用在其它主题上不会有效果,甚至可能会报错,使用前请留意。
标签外挂虽然能为主题带来一些额外的功能和 UI 方面的强化,但是,标签外挂也有明显的限制,使用时请留意。
只需要将标签写在 md 文件内即可使用,详细写法请阅读 安知鱼主题标签 Tag Plugins 查看。
百度统计的官方网站
谷歌分析的官方网站
Cloudflare 分析的官方网站
Microsoft Clarity 的官方网站
谷歌广告
主题已集成谷歌广告(自动广告)
修改 主题配置文件
1 2 3 4 5 6 google_adsense: enable: true auto_ads: true js: https://pagead2.googlesyndication.com/pagead/js/adsbygoogle.js client: enable_page_level_ads: true
手动广告配置
主题预留了三个位置可供插入广告,分别为主页文章(每三篇文章出现广告)/aside 公告之后/文章页打赏之后。 把 html 代码填写到对应的位置。
修改 主题配置文件
1 2 3 4 ad: index: aside: post:
例如:
1 index: <ins class="adsbygoogle" style="display:block" data-ad-format="fluid" data-ad-layout-key="xxxxxxxxxxxx" data-ad-client="ca-pub-xxxxxxxxxx" data-ad-slot="xxxxxxxxxx"></ins><script>(adsbygoogle=window.adsbygoogle||[]).push({})</script>
当进入网页时,因为加载速度的问题,可能会导致 top_img 图片出现断层显示,或者网页加载不全而出现等待时间,开启 preloader 后,会显示加载动画,等页面加载完,加载动画会消失。
主题支持 pace.js 的加载动画,具体可查看 pace.js
修改 主题配置文件,其中avatar可以自定义加载时的头像
1 2 3 4 5 6 7 8 9 10 11 preloader: enable: true source: 3 pace_css_url: avatar: https://xiansakana.oss-cn-beijing.aliyuncs.com/img/202309191709924.jpg
如果你并不想为某张图片添加大图查看模式,你可以使用 html 格式引用图片,併为图片添加 no-lightbox class 名。
修改 主题配置文件
1 2 3 fancybox: true medium_zoom: false
当用户点击链接,通过 ajax 更新页面需要变化的部分,然后使用 HTML5 的 pushState 修改浏览器的 URL 地址。
这样可以不用重复加载相同的资源(css/js), 从而提升网页的加载速度。
1 2 3 4 5 6 7 8 pjax: enable: true exclude: - /music/ - /no-pjax/
对于一些第三方插件,有些并不支持 pjax 。 你可以把网页加入到 exclude 里,这个网页会被 pjax 排除在外。 点击该网页会重新加载网站
使用 pjax 后,一些自己 DIY 的 js 可能会无效,跳转页面时需要重新调用,请参考Pjax 文档 使用 pjax 后,一些个别页面加载的 js/css,将会改为所有页面都加载
主题默认开启 Pjax,大量服务依赖于 pjax,关闭可能会造成破坏性问题。
安知鱼主题的的 Pjax 目前仍有一些问题,请留意
使用谷歌广告可能会报错(例如自动广告) 如果你在使用中发现问题,欢迎反馈 Bugs
Snackbar 弹窗,根据自己爱好开启
修改 主题配置文件
1 2 3 4 5 6 7 8 9 snackbar: enable: true position: bottom-left bg_light: "#49b1f5" bg_dark: "#2d3035"
如果你跟我一样,每次看到网页上的中文字和英文、数字、符号挤在一块,就会坐立难安,忍不住想在它们之间加个空格。这个外挂正是你在网路世界走跳所需要的东西,它会自动替你在网页中所有的中文字和半形的英文、数字、符号之间插入空白。
修改 主题配置文件
1 2 3 4 5 pangu: enable: true field: post
field只支持两个参数,post(只在文章页生效)和site(全站生效)
PWA 是 web 优化的一种手段,主题做了一定的适配,但是依然需要进行配置。要为 AnZhiYu 配上 PWA 特性, 你可以进行选择以下两种方式来进行适配,要为 AnZhiYu 配上 PWA 特性, 你需要如下几个步骤:
打开 hexo 工作目录
npm install hexo-offline --save 或者 yarn add hexo-offline在根目录创建 hexo-offline.config.cjs 文件,并增加以下内容。
1 2 3 4 5 6 7 8 9 10 11 12 13 14 15 16 17 18 19 20 21 22 23 24 25 26 27 28 29 30 31 32 33 34 35 36 37 38 // offline config passed to workbox-build. module.exports = { globPatterns: ["css/*.css", "404.html" , "js/**" , "anzhiyu/random.js" , "img/**" , "manifest.json" ], // 静态文件合集,如果你的站点使用了例如 webp 格式的文件,请将文件类型添加进去。 globDirectory: "public" , swDest: "public/service-worker.js" , maximumFileSizeToCacheInBytes: 10485760 , // 缓存的最大文件大小,以字节为单位。 skipWaiting: true , clientsClaim: true , runtimeCaching: [ // 如果你需要加载 CDN 资源,请配置该选项,如果没有,可以不配置。 // CDNs - should be CacheFirst, since they should be used specific versions so should not change { urlPattern: /^https:\/\/npm\.elemecdn\.com\/anzhiyu-blog/, // 缓存elmentcdn handler: "CacheFirst" , }, ], manifestTransforms: [ async (manifestEntries, compilation) => { const timestamp = new Date().toISOString().replace(/[-:.TZ]/g, "" ); // 获取当前时间戳 manifestEntries.push( { url: "/" , revision: `index-${timestamp}`, }, { url: "music/" , revision: `music-${timestamp}`, }, { url: "about/" , revision: `about-${timestamp}`, } ); return { manifest: manifestEntries }; }, ], };
更多内容请查看 hexo-offline 的官方文档
在主题配置文件中开启 pwa 选项。
1 2 3 4 5 6 7 8 9 10 11 12 13 pwa: enable: true startup_image_enable: true manifest: /manifest.json theme_color: var(--anzhiyu-main) mask_icon: /img/siteicon/apple-icon-180.png apple_touch_icon: /img/siteicon/apple-icon-180.png bookmark_icon: /img/siteicon/apple-icon-180.png favicon_32_32: /img/siteicon/32.png favicon_16_16: /img/siteicon/16.png
在创建source/目录中创建manifest.json文件。
1 2 3 4 5 6 7 8 9 10 11 12 13 14 15 16 17 18 19 20 21 22 23 24 25 26 27 28 29 30 31 32 33 34 35 36 37 { "name" : "安知鱼`Blog" , "short_name" : "安知鱼" , "theme_color" : "#3b70fc" , "background_color" : "#3b70fc" , "display" : "fullscreen" , "scope" : "/" , "start_url" : "/" , "id" : "/" , "icons" : [ { "src" : "img/siteicon/manifest-icon-192.maskable.png" , "sizes" : "192x192" , "type" : "image/png" , "purpose" : "any" }, { "src" : "img/siteicon/manifest-icon-192.maskable.png" , "sizes" : "192x192" , "type" : "image/png" , "purpose" : "maskable" }, { "src" : "img/siteicon/manifest-icon-512.maskable.png" , "sizes" : "512x512" , "type" : "image/png" , "purpose" : "any" }, { "src" : "img/siteicon/manifest-icon-512.maskable.png" , "sizes" : "512x512" , "type" : "image/png" , "purpose" : "maskable" } ], "splash_pages" : null }
你也可以通过 Web App Manifestopen 快速创建manifest.json。(Web App Manifest 要求至少包含一个 512*512 像素的图标)
可以通过Chrome插件Lighthouse检查 PWA 配置是否生效以及配置是否正确。
打开博客页面
启动Lighthouse插件 (Lighthouse 插件要求至少包含一个 512*512 像素的图标)。
关于 PWA(渐进式增强 Web 应用)的更多内容请参考 Google Tools for Web Developersopen
生成 pwa 启动图
安装 pwa-asset-generator,执行以下命令
1 npm install pwa-asset-generator
1 npx pwa-asset-generator ./public/img/512.png ./public/img/siteicon --padding "calc(50vh - 20%) calc(50vw - 40%)" -s false -h true
这条命令会使用themes/source/img/512.png这张图片来生成 siteicon 到目录/public/img/siteicon中,由于hexo cl会清除/public目录中的文件,所以每次hexo d之前都需要执行,如果不想每次hexo d之前都执行的话,可以将主题中的themes/source/img/512.png图片复制移动到根目录``/source/img中,然后将生成后的/public/img/siteicon文件夹复制到根目录``/source/img中,这样根目录``/source/img中就会一直有siteicon,以后执行hexo g时,也会将siteicon生成到public目录中。
在 head 里增加一些 meta 资料,例如缩略图、标题、时间等等。当你分享网页到一些平台时,平台会读取 Open Graph 的内容,展示缩略图,标题等等信息。
修改 主题配置文件
1 2 3 4 5 6 7 8 9 10 11 12 Open_Graph_meta: enable: true option:
有些 CSS 并不是所有浏览器都支持,需要增加对应的前缀才会生效。
开启 css_prefix 后,会自动为一些 CSS 增加前缀。(会增加 20%的体积)
修改 主题配置文件
如想添加额外的 js/css/meta 等等东西,可以在 Inject 里添加,支持添加到 head(</body>标签之前)和 bottom(</html>标签之前)。
请注意:以标准的 html 格式添加内容
1 2 3 4 5 inject: head: - <link rel="stylesheet" href="/self.css"> bottom: - <script src="xxxx"></script>
留意:如果你的网站根目录不是’/',使用本地图片时,需加上你的根目录。
例如:网站是 https://yoursite.com/blog,引用css/xx.css,则设置为<link rel="stylesheet" href="/blog/css/xx.css">
CDN,里面是主题所引用到的文件,可自行配置 CDN。(非必要请勿修改,配置后请确认链接是否能访问)
1 2 3 4 5 6 7 8 9 10 11 12 13 14 15 16 17 18 19 20 21 22 23 24 25 26 27 28 29 30 31 32 33 34 35 36 37 38 39 40 41 42 43 44 45 46 47 48 49 50 51 52 53 54 55 56 57 58 59 60 61 62 63 64 65 66 67 68 69 70 71 72 73 74 75 76 77 78 79 80 81 82 83 84 85 CDN: internal_provider: local third_party_provider: cbd version: true custom_format: option:
参数
解释
internal_provider
主题内部文件 可选 local/jsdelivr/unpkg/cdnjs/custom lcoal 为本地加载,custom 为自定义格式,需配置 custom_format 注意 : 如果使用的是 Dev 版,只能设置为 local
third_party_provider
第三方文件 可选 local/jsdelivr/unpkg/cdnjs/custom lcoal 为本地加载,custom 为自定义格式,需配置 custom_format 注意 : 如果你选择 local 则需要自行将文件都下载至本地,并修改对应的选项,否则会报错。
version
true/false 为 cdn 加上指定版本号
custom_format
自定义格式
option
你可以在这里更换部分文件,会覆盖原有的配置
version
如需修改版本号,可修改主题目录的 ‘plugins.yml’ 中对应插件的 version
请确保你修改的版本号,你所使用的 cdn 有收录
custom_format
提供以下参数
参数
解释
name
npm 上的包名
file
npm 上的文件路径
min_file
cdnjs 上的包名
cdnjs_file
cdnjs 上的文件路径
min_cdnjs_file
cdnjs 上的文件路径(压缩过的文件)
version
插件版本号
部分可用的第三方 CDN 列表
请确保你选择的 CDN 有收录主题使用的第三方插件
主题配置文件中
1 2 3 4 5 diytitle: enable: true leaveTitle: w(゚Д゚)w 不要走!再看看嘛! backTitle: ♪(^∇^*)欢迎肥来!
如果你需要像我一样首页双栏,修改主题配置文件_config.anzhiyu.yml(主题版本需要 1.1.1 以及以上)
1 2 article_double_row: true
首页技能点轮播下的分类,可通过配置主题配置文件
1 2 3 4 5 6 7 8 9 10 11 12 13 14 15 16 17 18 19 20 21 22 23 24 25 26 27 28 29 30 31 32 33 home_top: enable: true timemode: date title: 活在当下 subTitle: 及时摸鱼。 siteText: xiansakana.xyz category: - name: 学习 path: /categories/学习/ shadow: var(--anzhiyu-shadow-blue) class: blue icon: anzhiyu-icon-dove - name: 游戏 path: /categories/游戏/ shadow: var(--anzhiyu-shadow-red) class: red icon: anzhiyu-icon-fire - name: 生活 path: /categories/生活/ shadow: var(--anzhiyu-shadow-green) class: green icon: anzhiyu-icon-book default_descr: 再怎么看我也不知道怎么描述它的啦! swiper: enable: false swiper_css: https://npm.elemecdn.com/[email protected] /swiper/swiper.min.css swiper_js: https://npm.elemecdn.com/[email protected] /swiper/swiper.min.js banner: tips: 夜深了 title: 早点睡觉吧 image: https://cdn.jsdelivr.net/npm/xiansakana-blog-img/202309210219999.gif link: http://xiansakana.xyz
首先你需要有categories,需配置过分类页面
当前分类下有文章,此处以学习分类为例子
当这个分类下存在文章了以后,这个分类就会产生对应的路径,比如此处产生的是https://你的域名/categories/学习/,所以配置中应该是/categories/学习/。
只需要在创建分类以后在对应的文章中添加上对应的分类,配置 path 即可,注意一定要对应。
参数
解释
name
用于显示的分类名称
path
跳转的路径
shadow
阴影的颜色
class
类名
icon
图标名,默认使用内置阿里图标参考: 图标配置
在根目录创建source/_data/creativity.yml,输入以下内容
1 2 3 4 5 6 7 8 9 10 11 12 13 14 15 16 17 18 19 20 21 22 23 24 25 26 27 28 29 30 31 32 33 34 35 36 37 38 39 40 41 42 43 44 45 46 47 48 49 50 - class_name: 开启创造力 creativity_list: - name: Java color: "#fff" icon: https://bu.dusays.com/2023/04/09/643293b1184e9.jpg - name: Docker color: "#57b6e6" icon: https://bu.dusays.com/2023/04/09/643293b0f0abe.png - name: Photoshop color: "#4082c3" icon: https://bu.dusays.com/2022/12/15/639aa3a5c240e.png - name: Node color: "#333" icon: https://npm.elemecdn.com/[email protected] /img/svg/node-logo.svg - name: Webpack color: "#2e3a41" icon: https://bu.dusays.com/2023/04/09/643293b68026c.png - name: Pinia color: "#fff" icon: https://npm.elemecdn.com/[email protected] /img/svg/pinia-logo.svg - name: Python color: "#fff" icon: https://bu.dusays.com/2023/04/09/643293b1230f7.png - name: Vite color: "#937df7" icon: https://npm.elemecdn.com/[email protected] /img/svg/vite-logo.svg - name: Flutter color: "#4499e4" icon: https://bu.dusays.com/2023/04/09/643293b1055c2.png - name: Vue color: "#b8f0ae" icon: https://bu.dusays.com/2023/04/09/643293b6788bd.png - name: React color: "#222" icon: data:image/svg+xml;base64,PHN2ZyB4bWxucz0iaHR0cDovL3d3dy53My5vcmcvMjAwMC9zdmciIHZpZXdCb3g9Ii0xMS41IC0xMC4yMzE3NCAyMyAyMC40NjM0OCI+CiAgPHRpdGxlPlJlYWN0IExvZ288L3RpdGxlPgogIDxjaXJjbGUgY3g9IjAiIGN5PSIwIiByPSIyLjA1IiBmaWxsPSIjNjFkYWZiIi8+CiAgPGcgc3Ryb2tlPSIjNjFkYWZiIiBzdHJva2Utd2lkdGg9IjEiIGZpbGw9Im5vbmUiPgogICAgPGVsbGlwc2Ugcng9IjExIiByeT0iNC4yIi8+CiAgICA8ZWxsaXBzZSByeD0iMTEiIHJ5PSI0LjIiIHRyYW5zZm9ybT0icm90YXRlKDYwKSIvPgogICAgPGVsbGlwc2Ugcng9IjExIiByeT0iNC4yIiB0cmFuc2Zvcm09InJvdGF0ZSgxMjApIi8+CiAgPC9nPgo8L3N2Zz4K - name: CSS3 color: "#2c51db" icon: https://bu.dusays.com/2022/12/15/639aa3a5c251e.png - name: JS color: "#f7cb4f" icon: https://bu.dusays.com/2023/04/09/643293b121f02.png - name: HTML color: "#e9572b" icon: https://bu.dusays.com/2022/12/15/639aa3a5c241c.png - name: Git color: "#df5b40" icon: https://bu.dusays.com/2023/04/09/643293b10ccdd.webp - name: Apifox color: "#e65164" icon: https://bu.dusays.com/2022/11/19/6378d6458c6b6.png
关闭peoplecanvas
1 2 3 4 peoplecanvas: enable: false img: https://upload-bbs.miyoushe.com/upload/2023/09/03/125766904/ee23df8517f3c3e3efc4145658269c06_5714860933110284659.png
此时可以看到首页顶部已经有技能点的轮播了。
要为 AnZhiYu 配上字数统计特性, 你需要如下几个步骤:
打开 hexo 工作目录
1 npm install hexo-wordcount --save
修改 主题配置文件:
1 2 3 4 5 wordcount: enable: true post_wordcount: true min2read: true total_wordcount: true
如果需要搜索引擎收录网站,可能需要登录对应搜索引擎的管理平台进行提交。 各自的验证码可从各自管理平台拿到
修改 主题配置文件
Mathjax
不要在标题里使用 mathjax 语法,toc 目录不一定能正确显示 mathjax,可能显示 mathjax 代码
建议使用 KaTex 获得更好的效果,下文有介绍!
修改 主题配置文件:
1 2 3 4 5 mathjax: enable: true per_page: true
如果 per_page 设为 true,则每一页都会加载 Mathjax 服务。设为 false,则需要在文章 Front-matter 添加 mathjax: true,对应的文章才会加载 Mathjax 服务。
然后你需要修改一下默认的 markdown 渲染引擎来实现 MathJax 的效果。
查看: hexo-renderer-kramed
以下操作在你 hexo 博客的目录下 (不是 Anzhiyu 的目录 ):
安装插件
1 2 npm uninstall hexo-renderer-marked --save npm install hexo-renderer-kramed --save
配置 hexo 根目录的配置文件
1 2 3 4 5 6 7 8 kramed: gfm: true pedantic: false sanitize: false tables: true breaks: true smartLists: true smartypants: true
KaTex
不要在标题里使用 KaTeX 语法,toc 目录不能正确显示 KaTeX。
首先禁用 MathJax(如果你配置过 MathJax 的话),然后修改你的主题配置文件以便加载 katex.min.css:
1 2 3 4 5 6 katex: enable: true per_page: false hide_scrollbar: true
你不需要添加 katex.min.js 来渲染数学方程。相应的你需要卸载你之前的 hexo 的 markdown 渲染器,然后安装其它插件。
因为 KaTeX 更快更轻量,因此没有 MathJax 的功能多(比如右键菜单)。为那些使用 MathJax 的用户,主题也内置了 katex 的 复制 功能。
hexo-renderer-markdown-it
卸载掉 marked 插件,安装 hexo-renderer-markdown-it
1 2 3 4 5 npm un hexo-renderer-marked --save npm un hexo-renderer-kramed --save npm i hexo-renderer-markdown-it --save npm install katex @renbaoshuo/markdown-it-katex
在 hexo 的根目录的_config.yml 中配置
1 2 3 markdown: plugins: - "@renbaoshuo/markdown-it-katex"
如需配置其它参数,请参考 katex 官网
hexo-renderer-markdown-it-plus
注意,此方法生成的 katex 没有斜体
卸载掉 marked 插件,然后安装新的hexo-renderer-markdown-it-plus:
1 2 3 4 5 6 7 8 9 10 11 npm un hexo-renderer-marked --save npm un hexo-renderer-kramed --save npm i @upupming/hexo-renderer-markdown-it-plus --save
注意到 hexo-renderer-markdown-it-plus 已经无人持续维护, 所以我们使用 @upupming/hexo-renderer-markdown-it-plus。 这份 fork 的代码使用了 @neilsustc/markdown-it-katex 同时它也是 VSCode 的插件 Markdown All in One 所使用的, 所以我们可以获得最新的 KaTex 功能例如 \tag{}。
你还可以通过 @neilsustc/markdown-it-katex 控制 KaTeX 的设置,所有可配置的选项参见 https://katex.org/docs/options.html 。 比如你想要禁用掉 KaTeX 在命令行上输出的宂长的警告信息,你可以在根目录的 _config.yml 中使用下面的配置将 strict 设置为 false
1 2 3 4 5 6 7 markdown_it_plus: plugins: - plugin: name: '@neilsustc/markdown-it-katex' enable : true options: strict: false
当然,你还可以利用这个特性来定义一些自己常用的 macros。
根目录执行 git bash
1 npm install --save hexo-filter-flowchart
algolia
记得运行 hexo clean
使用 hexo-algoliasearch ,请记得配置 fields 参数的 title, permalink 和 content
你需要安装 hexo-algoliasearch 并且根据它的说明文档去做相应的配置。
修改 主题配置文件
1 2 3 4 algolia_search: enable: true hits: per_page: 6
在 hexo 目录配置文件
1 2 3 4 5 6 7 8 9 10 11 12 13 14 15 16 algolia: appId: "xxxx" apiKey: "xxxx" adminApiKey: "xxxx" chunkSize: 5000 indexName: "hexo" fields: - content:strip:truncate,0,200 - excerpt:strip - gallery - permalink - photos - slug - tags - title
本地搜索
记得运行 hexo clean
你需要安装 hexo-generator-search ,根据它的文档去做相应配置
1 npm install hexo-generator-search --save
修改主题配置文件
1 2 3 4 local_search: enable: true preload: ture CDN:
参数
解释
enable
是否开启本地搜索
preload
预加载,开启后,进入网页后会自动加载搜索文件。关闭时,只有点击搜索按钮后,才会加载搜索文件
CDN
搜索文件的 CDN 地址(默认使用的本地链接)
在 Hexo 配置文件_config.yml中添加
1 2 3 4 search: path: search.xml field: all content: true
DocSearch
DocSearch 是另一款由 algolia 提供的搜索服务,具体申请和使用请查看 DocSearch 文档
1 2 3 4 5 6 docsearch: enable: false appId: apiKey: indexName: option:
参数
解释
enable
【必须】是否开启 docsearch
appId
【必须】你的 Algolia 应用 ID
apiKey
【必须】你的 Algolia 搜索 API key
indexName
【必须】你的 Algolia index name
option
【可选】其余的 docsearch 配置 具体配置可查这里
sharejs
如果你不知道 sharejs ,看看它的説明。
修改 主题配置文件
1 2 3 sharejs: enable: true sites: facebook,twitter,wechat,weibo,qq
addtoany
可以到 addtoany 查看使用説明
1 2 3 addtoany: enable: true item: facebook,twitter,wechat,sina_weibo,facebook_messenger,email,copy_link
通用配置
开启评论需要在 comments-use 中填写你需要的评论。
支持双评论显示,只需要配置两个评论(第一个为默认显示)
1 2 3 4 5 6 7 8 9 10 comments: use: Twikoo,Waline text: true lazyload: false count: true card_post_count: false
参数
解释
use
使用的评论(请注意,最多支持两个,如果不需要请留空)
text
是否显示评论服务商的名字
lazyload
是否为评论开启 lazyload,开启后,只有滚动到评论位置时才会加载评论所需要的资源(开启 lazyload 后,评论数将不显示)
count
是否在文章顶部显示评论数
card_post_count
是否在首页文章卡片显示评论数
Twikoo
Twikoo 是一个简洁、安全、无后端的静态网站评论系统,基于腾讯云开发 。
具体如何配置评论,请查看 Twikoo
你只需要把获取到的 环境 ID (envId) 填写到配置上去就行
修改 主题配置文件
1 2 3 4 5 6 7 twikoo: envId: region: visitor: false option:
参数
解释
envId
环境 ID
region
环境地域,默认为 ap-shanghai,如果您的环境地域不是上海,需传此参数
visitor
是否显示文章阅读数
option
可选配置
card_post_count
是否在首页文章卡片显示评论数
开启 visitor 后,文章页的访问人数将改为 Twikoo 提供,而不是 不蒜子
Valine
遵循 Valine 的指示去配置你的 LeanCloud 应用。以及查看相应的配置说明。
然后修改 主题配置文件:
1 2 3 4 5 6 7 8 valine: appId: appKey: avatar: monsterid serverURLs: bg: visitor: false option:
开启 visitor 后,文章页的访问人数将改为 Valine 提供,而不是 不蒜子
Valine 于 v1.4.5 开始支持自定义表情,如果你需要自行配置,请在 emojiCDN 配置表情 CDN。
同时在 Hexo 工作目录下的 source/_data/创建一个 json 文件 valine.json,等同于 Valine 需要配置的 emojiMaps,valine.json 配置方式可参考如下
valine.json
1 2 3 4 5 6 7 8 9 10 11 12 13 14 15 16 17 18 19 20 21 22 23 { "tv_doge" : "6ea59c827c414b4a2955fe79e0f6fd3dcd515e24.png" , "tv_亲亲" : "a8111ad55953ef5e3be3327ef94eb4a39d535d06.png" , "tv_偷笑" : "bb690d4107620f1c15cff29509db529a73aee261.png" , "tv_再见" : "180129b8ea851044ce71caf55cc8ce44bd4a4fc8.png" , "tv_冷漠" : "b9cbc755c2b3ee43be07ca13de84e5b699a3f101.png" , "tv_发怒" : "34ba3cd204d5b05fec70ce08fa9fa0dd612409ff.png" , "tv_发财" : "34db290afd2963723c6eb3c4560667db7253a21a.png" , "tv_可爱" : "9e55fd9b500ac4b96613539f1ce2f9499e314ed9.png" , "tv_吐血" : "09dd16a7aa59b77baa1155d47484409624470c77.png" , "tv_呆" : "fe1179ebaa191569b0d31cecafe7a2cd1c951c9d.png" , "tv_呕吐" : "9f996894a39e282ccf5e66856af49483f81870f3.png" , "tv_困" : "241ee304e44c0af029adceb294399391e4737ef2.png" , "tv_坏笑" : "1f0b87f731a671079842116e0991c91c2c88645a.png" , "tv_大佬" : "093c1e2c490161aca397afc45573c877cdead616.png" , "tv_大哭" : "23269aeb35f99daee28dda129676f6e9ea87934f.png" , "tv_委屈" : "d04dba7b5465779e9755d2ab6f0a897b9b33bb77.png" , "tv_害羞" : "a37683fb5642fa3ddfc7f4e5525fd13e42a2bdb1.png" , "tv_尴尬" : "7cfa62dafc59798a3d3fb262d421eeeff166cfa4.png" , "tv_微笑" : "70dc5c7b56f93eb61bddba11e28fb1d18fddcd4c.png" , "tv_思考" : "90cf159733e558137ed20aa04d09964436f618a1.png" , "tv_惊吓" : "0d15c7e2ee58e935adc6a7193ee042388adc22af.png" }
Waline
Waline - 一款从 Valine 衍生的带后端评论系统。可以将 Waline 等价成 With backend Valine。
具体配置可参考 waline 文档
然后修改 主题配置文件:
1 2 3 4 5 waline: serverURL: bg: pageview: false option:
开启 pageview 后,文章页的访问人数将改为 Waline 提供,而不是 不蒜子
通用配置
这些工具都提供了一个按钮可以打开/关闭聊天窗口。 主题也提供了一个集合主题特色的按钮来替换这些工具本身的按钮,这个聊天按钮将会出现在右下角里。 你只需要把 chat_btn 打开就行。
修改 主题配置文件
为了不影响访客的体验,主题提供一个 chat_hide_show 配置 设为 true 后,使用工具提供的按钮时,只有向上滚动才会显示聊天按钮,向下滚动时会隐藏按钮。
修改 主题配置文件
如果使用工具自带的聊天按钮,按钮位置可能会遮挡右下角图标,请配置 rightside-bottom 调正右下角图标位置
chatra
配置 chatra ,需要知道 Public key
打开 chatra 并注册账号。 你可以在 Preferences 中找到 Public key
修改 主题配置文件
1 2 3 4 5 chatra: enable: true id: xxxxxxxx
chatra 的样式你可以 Chat Widget 自行配置
tidio
配置 tidio,需要知道 Public key
打开 tidio 并注册账号。 你可以在 Preferences > Developer 中找到 Public key
修改 主题配置文件
1 2 3 4 5 tidio: enable: true public_key: XXXX
tidio的样式你可以Channels自行配置
daovoice
打开 daovoiceopen in new window 和注册帐号
找到你的 app id
修改 主题配置文件
1 2 3 4 5 daovoice: enable: true app_id: xxxxx
可在聊天设置里配置聊天按钮等样式
crisp
打开 crisp 并注册帐号
找到需要的网站 ID
1 2 3 4 5 crisp: enable: false website_id: xxxxxxxx
messenger
messenger 为 Facebook 旗下的聊天服务
具体操作请查看 Facebook 洽谈附加程式 - Messenger 平台
1 2 3 4 messenger: enable: false pageID: xxxxx lang: zh_TW
参考: https://github.com/rozbo/hexo-abbrlink
在 Hexo 博客根目录下打开终端,输入
1 npm install hexo-abbrlink --save
在 Hexo 配置文件_config.yml里面修改
1 permalink: posts/:abbrlink.html
并添加
1 2 3 4 5 6 7 8 9 10 11 12 13 14 15 abbrlink: alg: crc32 rep: hex drafts: false auto_category: enable: true depth: over_write: false auto_title: false auto_date: false force: false
在 Hexo 博客根目录下打开终端,输入
1 2 3 4 npm install --save hexo-helper-live2d npm install --save live2d-widget-model-z16
在 Hexo 配置文件_config.yml里面添加
1 2 3 4 5 6 7 8 9 10 11 12 13 14 15 16 17 live2d: enable: true scriptFrom: local tagMode: false debug: false model: use: live2d-widget-model-z16 display: position: right width: 150 height: 300 mobile: show: false
参考链接:https://github.com/hexojs/hexo-generator-sitemap
在 Hexo 博客根目录下打开终端,输入
1 2 npm install hexo-generator-sitemap --save npm install hexo-generator-baidu-sitemap --save-dev
在 Hexo 配置文件_config.yml里面添加
1 2 3 4 5 6 sitemap: path: sitemap.xml rel: false tags: true categories: true
在 Hexo 博客根目录下打开终端,输入
1 npm install hexo-generator-feed --save
在 Hexo 配置文件_config.yml里面添加
1 2 3 4 5 6 7 feed: type: atom path: atom.xml limit: 20 rss: /atom.xml
参考链接:https://github.com/MoePlayer/hexo-tag-aplayer
在 Hexo 博客根目录下打开终端,输入
1 npm install hexo-tag-aplayer --save
在主题配置文件里面修改
1 2 3 aplayerInject: enable: true per_page: true
在主题配置文件中inject 的bottom里面添加下面自定义 js 代码
1 2 3 4 5 6 7 8 9 10 inject: head: bottom: - <div cla="true" data-preload="auto" data-ss="aplayer no -destroy" data-id="444551276" data-server="netease" data-type="playlist" data-order="list" data-fixedautoplay="false" data-mutex="true" ></div>
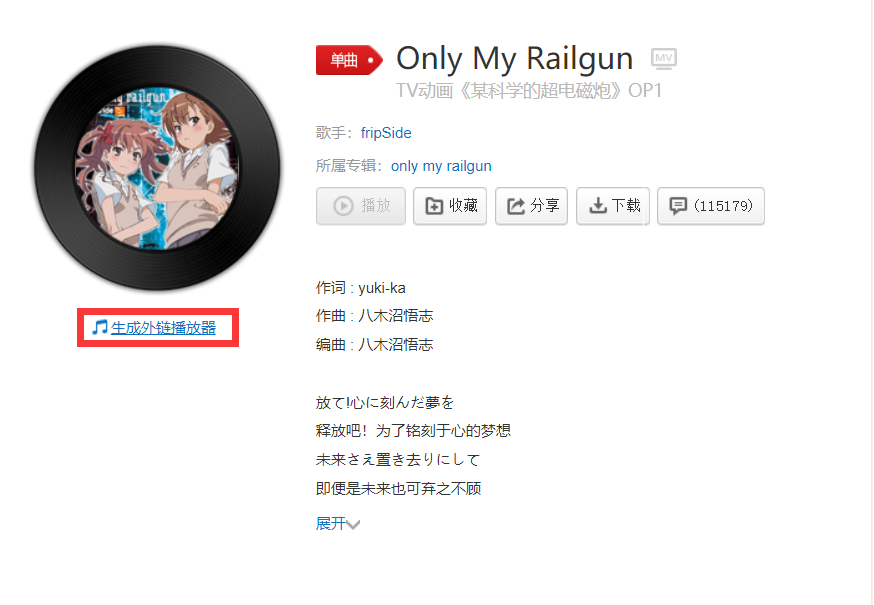
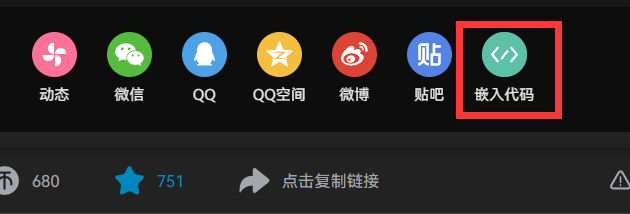
1 {% aplayer "name" "author" "url" "pic" "lrc" %}
文章中引用音乐可以直接用 iframe 格式,而 iframe 外链一般可以通过音乐网站生成
1 <iframe frameborder ="no" border ="0" marginwidth ="0" marginheight ="0" width =330 height =86 src ="//music.163.com/outchain/player?type=2&id=725692&auto=1&height=66" > </iframe >
歌单配置很简单,只需要修改主题配置文件中nav_music即可
1 2 3 4 5 6 7 8 nav_music: enable: true console_widescreen_music: true id: 444551276 server: netease
参考链接:https://github.com/MoePlayer/hexo-tag-dplayer
在 Hexo 博客根目录下打开终端,输入
1 npm install hexo-tag-dplayer --save
在主题配置文件里面添加
1 2 3 dplayer: enable: true useCDN: true
1 {% dplayer "url=https://xiansakana.oss-cn-beijing.aliyuncs.com/video/mad/FRIEND.mp4" %}
文章中引用视频可以直接用 iframe 格式,而 iframe 外链一般可以通过视频网站生成,例如 b 站
1 <iframe src ="//player.bilibili.com/player.html?aid=461536590&bvid=BV1uL411W7HT&cid=368370249&p=1" scrolling ="no" border ="0" frameborder ="no" framespacing ="0" allowfullscreen ="true" > </iframe >
打开_data 文件夹,创建一个 widget.yml 文件,在里面粘贴如下代码:
1 2 3 4 5 6 7 8 9 10 bottom: - class_name: weibo id_name: weibo name: 微博热搜 icon: fa-brands fa-weibo order: -2 html: | <link rel="stylesheet" href="/css/weibo.css"> <div id="weiboContent"></div> <script src="/js/weibo.js"></script>
在_config.anzhiyu.yml主题配置文件下inject配置项中head处引入weibo.css文件,bottom 处引入weibo.js文件
1 2 3 4 5 inject: head: - <link rel="stylesheet" href="/css/weibo.css"> bottom: - <script src="/js/weibo.js"></script>
在/source/css 目录下新建weibo.css
1 2 3 4 5 6 7 8 9 10 11 12 13 14 15 16 17 18 19 20 21 22 23 24 25 26 27 28 29 30 31 32 33 34 35 36 37 38 39 40 41 42 43 44 45 46 47 48 49 50 51 52 53 54 55 56 57 58 59 60 61 62 63 64 65 66 67 68 69 70 71 72 73 74 75 76 77 78 79 80 81 82 83 84 85 86 87 88 89 90 91 .weibo-new { background : #ff3852 ; } .weibo-hot { background : #ff9406 ; } .weibo-jyzy { background : #ffc000 ; } .weibo-recommend { background : #00b7ee ; } .weibo-adrecommend { background : #febd22 ; } .weibo-friend { background : #8fc21e ; } .weibo-boom { background : #bd0000 ; } .weibo-topic { background : #ff6f49 ; } .weibo-topic-ad { background : #4dadff ; } .weibo-boil { background : #f86400 ; } #weibo .item-content { text-align : center; } #weibo-container { width : 100% ; height : 140px ; font-size : 95% ; overflow-y : auto; -ms-overflow-style : none; scrollbar-width : none; } .weibo-list-item { display : flex; flex-direction : row; justify-content : space-between; flex-wrap : nowrap; } .weibo-title { white-space : nowrap; overflow : hidden; text-overflow : ellipsis; margin-right : auto; } .weibo-num { float : right; } .weibo-hotness { display : inline-block; padding : 0 6px ; transform : scale (0.8 ) translateX (-3px ); color : #fff ; border-radius : 8px ; } #weibo-container a { color : #555 ; } [data-theme="dark" ] #weibo-container a { color : rgba (255 , 255 , 255 , 0.7 ); } #weibo-container ::-webkit-scrollbar { display : none; }
在/source/js目录下新建weibo.js
1 2 3 4 5 6 7 8 9 10 11 12 13 14 15 16 17 18 19 20 21 22 23 24 25 26 27 28 29 30 31 32 33 34 35 36 37 38 39 40 41 42 43 44 45 46 47 48 49 50 51 52 53 54 55 56 57 58 try { if (document .getElementById("weibo" ).clientWidth) weibo(); } catch (error) {} function weibo ( let hotness = { 爆: "weibo-boom" , 热: "weibo-hot" , 沸: "weibo-boil" , 新: "weibo-new" , 荐: "weibo-recommend" , 音: "weibo-jyzy" , 影: "weibo-jyzy" , 剧: "weibo-jyzy" , 综: "weibo-jyzy" , }; let html = '<div id="weibo-container">' ; let data = JSON .parse(localStorage.getItem("weibo" )); let nowTime = Date .now(); let ls; if (data == null || nowTime - data.time > 600000 ) { getData(); return ; } else { ls = JSON .parse(data.ls); } for (let item of ls) { html += '<div class="weibo-list-item"><div class="weibo-hotness ' + hotness[item.hot || "荐" ] + '">' + (item.hot || "荐" ) + "</div>" + '<span class="weibo-title"><a title="' + item.title + '"href="' + item.url + '" target="_blank" rel="external nofollow noreferrer">' + item.title + "</a></span>" + '<div class="weibo-num"><span>' + item.num + "</span></div></div>" ; } html += "</div>" ; document .getElementById("weiboContent" ).innerHTML = html; } function getData ( fetch("https://wb.bore.vip/api" ) .then((data ) => data.json()) .then((data ) => { data = { time : Date .now(), ls : JSON .stringify(data) }; localStorage.setItem("weibo" , JSON .stringify(data)); }) .then(weibo); }
参考链接:为主页文章卡片添加擦亮动画效果
新建文件source/css/home.css或在已引入的 css 中新增以下内容
1 2 3 4 5 6 7 8 9 10 11 12 13 14 15 #recent-posts > .recent-post-item :not(a) ::before { content : "" ; position : absolute; top : 0 ; left : 0 ; width : 100% ; height : 200% ; background : linear-gradient (to right, transparent, white, transparent); transform : translateX (-200% ); transition : transform 0.5s linear; z-index : 1 ; } #recent-posts > .recent-post-item :not(a) :hover ::before { transform : translateX (100% ) skewX (-60deg ); }
在_config.anzhiyu.yml主题配置文件下inject配置项中head处引入home.css文件
1 2 3 inject: head: - <link rel="stylesheet" href="/css/home.css">
参考链接:首页背景图渐进式加载,解决卡顿难题
新建文件 source/js/imgloaded.js 新增以下内容,并按照注释调整图片路径,在 第 70 行至 76 行 处,配置自己的图片,这里我用的是随机二次元图片。
1 2 3 4 5 6 7 8 9 10 11 12 13 14 15 16 17 18 19 20 21 22 23 24 25 26 27 28 29 30 31 32 33 34 35 36 37 38 39 40 41 42 43 44 45 46 47 48 49 50 51 52 53 54 55 56 57 58 59 60 61 62 63 64 65 66 67 68 69 70 71 72 73 74 75 76 77 78 79 80 81 82 83 84 85 86 87 88 89 90 91 92 93 94 95 96 97 98 class ProgressiveLoad constructor (smallSrc, largeSrc) { this .smallSrc = smallSrc; this .largeSrc = largeSrc; this .initTpl(); } initTpl() { this .container = document .createElement("div" ); this .smallStage = document .createElement("div" ); this .largeStage = document .createElement("div" ); this .video = document .createElement("div" ); this .smallImg = new Image(); this .largeImg = new Image(); this .container.className = "pl-container" ; this .smallStage.className = "pl-img pl-blur" ; this .largeStage.className = "pl-img" ; this .video.className = "pl-video" ; this .container.appendChild(this .smallStage); this .container.appendChild(this .largeStage); this .container.appendChild(this .video); this .smallImg.onload = this ._onSmallLoaded.bind(this ); this .largeImg.onload = this ._onLargeLoaded.bind(this ); } progressiveLoad() { this .smallImg.src = this .smallSrc; this .largeImg.src = this .largeSrc; } _onLargeLoaded() { this .largeStage.classList.add("pl-visible" ); this .largeStage.style.backgroundImage = `url('${this .largeSrc} ')` ; } _onSmallLoaded() { this .smallStage.classList.add("pl-visible" ); this .smallStage.style.backgroundImage = `url('${this .smallSrc} ')` ; } } const executeLoad = (config, target ) => { const isMobile = window .matchMedia("(max-width: 767px)" ).matches; const loader = new ProgressiveLoad( isMobile ? config.mobileSmallSrc : config.smallSrc, isMobile ? config.mobileLargeSrc : config.largeSrc ); if (target.children[0 ]) { target.insertBefore(loader.container, target.children[0 ]); } loader.progressiveLoad(); }; const config = { smallSrc: "https://t.mwm.moe/pc" , largeSrc: "https://t.mwm.moe/pc" , mobileSmallSrc: "https://t.mwm.moe/mp" , mobileLargeSrc: "https://t.mwm.moe/mp" , enableRoutes: ["/" ], }; function initProgressiveLoad (config ) const target = document .getElementById("page-header" ); if (target && target.classList.contains("full_page" )) { executeLoad(config, target); } } function onPJAXComplete (config ) const target = document .getElementById("page-header" ); if (target && target.classList.contains("full_page" )) { initProgressiveLoad(config); } } document .addEventListener("DOMContentLoaded" , function ( initProgressiveLoad(config); }); document .addEventListener("pjax:complete" , function ( onPJAXComplete(config); });
新建文件source/css/imgloaded.css新增以下内容,并按照注释自行决定调整内容
1 2 3 4 5 6 7 8 9 10 11 12 13 14 15 16 17 18 19 20 21 22 23 24 25 26 27 28 29 30 31 32 33 34 35 36 37 38 39 40 41 42 43 44 45 46 47 48 49 50 51 .pl-container { width : 100% ; height : 100% ; position : relative; overflow : hidden; will-change : transform; animation : blur-to-clear 2s cubic-bezier (0.62 , 0.21 , 0.25 , 1 ) 0s 1 normal backwards running, scale 1.5s cubic-bezier (0.62 , 0.21 , 0.25 , 1 ) 0s 1 both; } .pl-img { width : 100% ; height : 100% ; position : absolute; background-position : center; background-size : cover; background-repeat : no-repeat; opacity : 0 ; transition : opacity 1s ; } @keyframes blur-to-clear { 0% { filter : blur (50px ); opacity : 1 ; } 100% { filter : blur (0 ); opacity : 1 ; } } @keyframes scale { 0% { transform : scale (1.5 ) translateZ (0 ); opacity : 0 ; } to { transform : scale (1 ) translateZ (0 ); opacity : 1 ; } } .pl-visible { opacity : 1 ; } .pl-blur { filter : blur (50px ); }
在_config.anzhiyu.yml主题配置文件下inject配置项中head和bottom处,分别引入imgloaded.css和imgloaded.js文件
1 2 3 4 5 6 inject: head: - <link rel="stylesheet" href="/css/imgloaded.css?1"> bottom: - <script async data-pjax src="/js/imgloaded.js?1"></script>
务必记得在主题配置文件中开启顶部图的功能。因为 js 文件已经接替了图片加载功能,此处不需要配置图片(当然你也可以配置上)。
1 2 index_img: "background: url() top / cover no-repeat"
参考链接:侧边栏添加个性定位欢迎信息卡片 , 在侧边栏添加个性定位欢迎信息
定位接口来自青桔
在 hexo 目录下新建source/js/welcome.js文件,新增以下内容(若没有 js 文件夹直接新建即可),第29 行需要自行修改所在经纬度
1 2 3 4 5 6 7 8 9 10 11 12 13 14 15 16 17 18 19 20 21 22 23 24 25 26 27 28 29 30 31 32 33 34 35 36 37 38 39 40 41 42 43 44 45 46 47 48 49 50 51 52 53 54 55 56 57 58 59 60 61 62 63 64 65 66 67 68 69 70 71 72 73 74 75 76 77 78 79 80 81 82 83 84 85 86 87 88 89 90 91 92 93 94 95 96 97 98 99 100 101 102 103 104 105 106 107 108 109 110 111 112 113 114 115 116 117 118 119 120 121 122 123 124 125 126 127 128 129 130 131 132 133 134 135 136 137 138 139 140 141 142 143 144 145 146 147 148 149 150 151 152 153 154 155 156 157 158 159 160 161 162 163 164 165 166 167 168 169 170 171 172 173 174 175 176 177 178 179 180 181 182 183 184 185 186 187 188 189 190 191 192 193 194 195 196 197 198 199 200 201 202 203 204 205 206 207 208 209 210 211 212 213 214 215 216 217 218 219 220 221 222 223 224 225 226 227 228 229 230 231 232 233 234 235 236 237 238 239 240 241 242 243 244 245 246 247 248 249 250 251 252 253 254 255 256 257 258 259 260 261 262 263 264 fetch("https://api.qjqq.cn/api/Local" ) .then((response ) => response.json()) .then((data ) => { ipLocation = data; showWelcome(); }) .catch((error ) => console .error("Error:" , error)); function getDistance (e1, n1, e2, n2 ) const R = 6371 ; const { sin, cos, asin, PI, hypot } = Math ; let getPoint = (e, n ) => { e *= PI / 180 ; n *= PI / 180 ; return { x : cos(n) * cos(e), y : cos(n) * sin(e), z : sin(n) }; }; let a = getPoint(e1, n1); let b = getPoint(e2, n2); let c = hypot(a.x - b.x, a.y - b.y, a.z - b.z); let r = asin(c / 2 ) * 2 * R; return Math .round(r); } function showWelcome ( let dist = getDistance( -74.007141 , 40.71455 , ipLocation.data.lng, ipLocation.data.lat ); let pos = ipLocation.data.country; let ip = ipLocation.ip; let posdesc; switch (ipLocation.data.country) { case "日本" : posdesc = "よろしく,一起去看樱花吗" ; break ; case "美国" : posdesc = "Let us live in peace!" ; break ; case "英国" : posdesc = "想同你一起夜乘伦敦眼" ; break ; case "俄罗斯" : posdesc = "干了这瓶伏特加!" ; break ; case "法国" : posdesc = "C'est La Vie" ; break ; case "德国" : posdesc = "Die Zeit verging im Fluge." ; break ; case "澳大利亚" : posdesc = "一起去大堡礁吧!" ; break ; case "加拿大" : posdesc = "拾起一片枫叶赠予你" ; break ; case "中国" : pos = ipLocation.data.prov + " " + ipLocation.data.city + " " + ipLocation.data.district; switch (ipLocation.data.prov) { case "北京市" : posdesc = "北——京——欢迎你~~~" ; break ; case "天津市" : posdesc = "讲段相声吧" ; break ; case "河北省" : posdesc = "山势巍巍成壁垒,天下雄关铁马金戈由此向,无限江山" ; break ; case "山西省" : posdesc = "展开坐具长三尺,已占山河五百余" ; break ; case "内蒙古自治区" : posdesc = "天苍苍,野茫茫,风吹草低见牛羊" ; break ; case "辽宁省" : posdesc = "我想吃烤鸡架!" ; break ; case "吉林省" : posdesc = "状元阁就是东北烧烤之王" ; break ; case "黑龙江省" : posdesc = "很喜欢哈尔滨大剧院" ; break ; case "上海市" : posdesc = "众所周知,中国只有两个城市" ; break ; case "江苏省" : switch (ipLocation.data.city) { case "南京市" : posdesc = "这是我挺想去的城市啦" ; break ; case "苏州市" : posdesc = "上有天堂,下有苏杭" ; break ; default : posdesc = "散装是必须要散装的" ; break ; } break ; case "浙江省" : posdesc = "东风渐绿西湖柳,雁已还人未南归" ; break ; case "河南省" : switch (ipLocation.data.city) { case "郑州市" : posdesc = "豫州之域,天地之中" ; break ; case "南阳市" : posdesc = "臣本布衣,躬耕于南阳此南阳非彼南阳!" ; break ; case "驻马店市" : posdesc = "峰峰有奇石,石石挟仙气嵖岈山的花很美哦!" ; break ; case "开封市" : posdesc = "刚正不阿包青天" ; break ; case "洛阳市" : posdesc = "洛阳牡丹甲天下" ; break ; default : posdesc = "可否带我品尝河南烩面啦?" ; break ; } break ; case "安徽省" : posdesc = "蚌埠住了,芜湖起飞" ; break ; case "福建省" : posdesc = "井邑白云间,岩城远带山" ; break ; case "江西省" : posdesc = "落霞与孤鹜齐飞,秋水共长天一色" ; break ; case "山东省" : posdesc = "遥望齐州九点烟,一泓海水杯中泻" ; break ; case "湖北省" : switch (ipLocation.data.city) { case "黄冈市" : posdesc = "红安将军县!辈出将才!" ; break ; default : posdesc = "来碗热干面~" ; break ; } break ; case "湖南省" : posdesc = "74751,长沙斯塔克" ; break ; case "广东省" : switch (ipLocation.data.city) { case "广州市" : posdesc = "看小蛮腰,喝早茶了嘛~" ; break ; case "深圳市" : posdesc = "今天你逛商场了嘛~" ; break ; case "阳江市" : posdesc = "阳春合水!博主家乡~ 欢迎来玩~" ; break ; default : posdesc = "来两斤福建人~" ; break ; } break ; case "广西壮族自治区" : posdesc = "桂林山水甲天下" ; break ; case "海南省" : posdesc = "朝观日出逐白浪,夕看云起收霞光" ; break ; case "四川省" : posdesc = "康康川妹子" ; break ; case "贵州省" : posdesc = "茅台,学生,再塞200" ; break ; case "云南省" : posdesc = "玉龙飞舞云缠绕,万仞冰川直耸天" ; break ; case "西藏自治区" : posdesc = "躺在茫茫草原上,仰望蓝天" ; break ; case "陕西省" : posdesc = "来份臊子面加馍" ; break ; case "甘肃省" : posdesc = "羌笛何须怨杨柳,春风不度玉门关" ; break ; case "青海省" : posdesc = "牛肉干和老酸奶都好好吃" ; break ; case "宁夏回族自治区" : posdesc = "大漠孤烟直,长河落日圆" ; break ; case "新疆维吾尔自治区" : posdesc = "驼铃古道丝绸路,胡马犹闻唐汉风" ; break ; case "台湾省" : posdesc = "我在这头,大陆在那头" ; break ; case "香港特别行政区" : posdesc = "永定贼有残留地鬼嚎,迎击光非岁玉" ; break ; case "澳门特别行政区" : posdesc = "性感荷官,在线发牌" ; break ; default : posdesc = "带我去你的城市逛逛吧!" ; break ; } break ; default : posdesc = "带我去你的国家逛逛吧" ; break ; } let timeChange; let date = new Date (); if (date.getHours() >= 5 && date.getHours() < 11 ) timeChange = "<span>🌤️ 早上好,一日之计在于晨</span>" ; else if (date.getHours() >= 11 && date.getHours() < 13 ) timeChange = "<span>☀️ 中午好,记得午休喔~</span>" ; else if (date.getHours() >= 13 && date.getHours() < 17 ) timeChange = "<span>🕞 下午好,饮茶先啦!</span>" ; else if (date.getHours() >= 17 && date.getHours() < 19 ) timeChange = "<span>🚶♂️ 即将下班,记得按时吃饭~</span>" ; else if (date.getHours() >= 19 && date.getHours() < 24 ) timeChange = "<span>🌙 晚上好,夜生活嗨起来!</span>" ; else timeChange = "夜深了,早点休息,少熬夜" ; try { document .getElementById( "welcome-info" ).innerHTML = `欢迎来自 <b><span style="color: var(--kouseki-ip-color);font-size: var(--kouseki-gl-size)">${pos} </span></b> 的小友💖<br>${posdesc} 🍂<br>当前位置距博主约 <b><span style="color: var(--kouseki-ip-color)">${dist} </span></b> 公里!<br>您的IP地址为:<b><span style="font-size: 12px;">${ip} </span></b><br>${timeChange} <br>` ; } catch (err) { console .log("Pjax无法获取元素" ); } } function handlePjaxComplete ( showWelcome(); } window .onload = function ( showWelcome(); document .addEventListener("pjax:complete" , handlePjaxComplete); };
在 hexo 目录下新建source/css/welcome.css文件,新增以下内容(若没有 css 文件夹直接新建即可)
1 2 3 4 5 6 7 #welcome-info { overflow : hidden; border-radius : 14px ; --kouseki-welcome-color : #49b1f5 ; --kouseki-ip-color : #49b1f5 ; --kouseki-gl-size : 16px !important ; }
在_config.anzhiyu.yml主题配置文件下inject配置项中的head引入welcome.css,bottom引入jquery.min.js和welcome.js
1 2 3 4 5 6 inject: head: - <link rel="stylesheet" href="/css/welcome.css?1"> bottom: - <script type="text/javascript" src="https://unpkg.zhimg.com/jquery@latest/dist/jquery.min.js"></script> - <script async data-pjax src="/js/welcome.js"></script>
在_config.anzhiyu.yml主题配置文件下aside配置项的card_announcement中添加以下内容
1 2 3 card_announcement: enable: true content: <div id="welcome-info"></div>
参考来源:hexo 主题 butterfly 首页字体黑夜霓虹灯效果
首先在 hexo 目录下新建source/css/light.css文件
1 2 3 4 5 6 7 8 9 10 [data-theme="dark" ] #nav .site-page ,[data-theme="dark" ] #nav .menus_items .menus_item .menus_item_child li a { text-shadow : 0 0 2px var (--theme-color) !important ; } [data-theme="dark" ] #sidebar #sidebar-menus .menus_items .site-page { text-shadow : 0 0 2px var (--theme-color) !important ; }
然后在 hexo 目录下新建source/js/light.js文件
1 2 3 4 5 6 7 8 9 10 11 12 13 14 15 16 17 18 19 20 21 22 23 24 25 26 27 28 29 30 31 32 33 34 35 36 37 38 39 40 41 42 43 44 45 46 47 48 49 50 51 52 53 54 55 56 57 58 59 60 61 62 63 64 65 66 67 68 69 70 71 var arr = [ "#39c5bb" , "#f14747" , "#f1a247" , "#f1ee47" , "#b347f1" , "#1edbff" , "#ed709b" , "#5636ed" , ]; var idx = 0 ;function changeColor ( if ( document .getElementsByTagName("html" )[0 ].getAttribute("data-theme" ) == "dark" ) { if (document .getElementById("site-name" )) document .getElementById("site-name" ).style.textShadow = arr[idx] + " 0 0 15px" ; if (document .getElementById("site-title" )) document .getElementById("site-title" ).style.textShadow = arr[idx] + " 0 0 15px" ; if (document .getElementById("site-subtitle" )) document .getElementById("site-subtitle" ).style.textShadow = arr[idx] + " 0 0 10px" ; if (document .getElementById("post-info" )) document .getElementById("post-info" ).style.textShadow = arr[idx] + " 0 0 5px" ; try { document .getElementsByClassName("author-info__name" )[0 ].style.textShadow = arr[idx] + " 0 0 12px" ; document .getElementsByClassName( "author-info__description" )[0 ].style.textShadow = arr[idx] + " 0 0 12px" ; } catch {} idx++; if (idx == 8 ) { idx = 0 ; } } else { if (document .getElementById("site-name" )) document .getElementById("site-name" ).style.textShadow = "#1e1e1ee0 1px 1px 1px" ; if (document .getElementById("site-title" )) document .getElementById("site-title" ).style.textShadow = "#1e1e1ee0 1px 1px 1px" ; if (document .getElementById("site-subtitle" )) document .getElementById("site-subtitle" ).style.textShadow = "#1e1e1ee0 1px 1px 1px" ; if (document .getElementById("post-info" )) document .getElementById("post-info" ).style.textShadow = "#1e1e1ee0 1px 1px 1px" ; try { document .getElementsByClassName("author-info__name" )[0 ].style.textShadow = "" ; document .getElementsByClassName( "author-info__description" )[0 ].style.textShadow = "" ; } catch {} } } window .onload = setInterval(changeColor, 1200 );
最后在_config.anzhiyu.yml主题配置文件下inject配置项中的head引入light.css,bottom引入light.js
1 2 3 4 5 inject: head: - <link rel="stylesheet" href="/css/light.css" media="defer" onload="this.media='all'"> bottom: - <script defer src="/js/light.js"></script>
前几天突然想给博客添加书单的功能,但是搜了很多教程,大多是那种豆瓣的书单,我想要的是自定义而且能够在线预览的那种。偶然间翻到一位大佬的书单,刚好符合我的想法,就拿过来参考了一下(hexo 博客增加书单 )。
创建书单页面
首先创建新页面
插入源代码
直接在生成的 index.md 文件中插入页面的 html 代码
1 2 3 4 5 6 7 8 9 10 11 12 13 14 15 16 17 18 19 20 21 22 23 24 25 26 27 28 29 30 31 32 33 <link rel ="stylesheet" href ="/css/book.css" /> <div class ="page" > <div class ="info" > <div class ="image" title ="无职转生" > <img src ="https://cdn.jsdelivr.net/npm/xiansakana-blog-https://assets.saoyu.fun/blog-https://assets.saoyu.fun/%E6%97%A0%E8%81%8C%E8%BD%AC%E7%94%9F/images/cover.jpg" /> </div > <div class ="info-card" > <h2 > <a href ="无职转生/无职转生.html" target ="_Blank" > 《无职转生》 </a > </h2 > <h4 > 作者:理不尽な孫の手</h4 > <h4 > 出版时间:</h4 > <p > 2014-01-24——2022-11-25</p > <h4 > <span > 推荐指数:</span > <span > <i class ="fas fa-star" > </i > <i class ="fas fa-star" > </i > <i class ="fas fa-star" > </i > <i class ="fas fa-star" > </i > <i class ="fas fa-star" > </i > </span > </h4 > <p class ="text" > 34岁无职童贞尼特身无分文地被赶出家门,发现自己的人生已经完全走投无路。刚刚产生后悔的想法,他就被卡车撞死了。然后醒来的地方居然是——剑与魔法的异世界!!重生为名叫卢迪乌斯的婴儿的他下定决心,“这次一定要认真地活下去……!”,一定要度过一段不会后悔的人生。他利用前世的智力很快使得自己的魔法的才能开花结果,结果一位年轻的女孩子成了自己的家庭教师。并且又与一位有着绿宝石般美丽秀发的四分一血统的精灵相遇。他崭新的人生开始前进。——让人憧憬的转生型奇幻小说,在这里开始。 </p > </div > </div > </div >
插入 css 来改变页面的样式
新建文件 source/css/book.css,插入以下代码
1 2 3 4 5 6 7 8 9 10 11 12 13 14 15 16 17 18 19 div .info { display : flex; flex-wrap : wrap; padding : 1rem ; } div .info div .image { flex : 1 1 200px ; display : flex; align-items : center; } div .info div .image img { width : 60% ; } div .info div .info-card { flex : 3 1 500px ; }
创建预览页面
这里我在根目录的 source 中创建了一个文件夹命名为 book,并将刚刚生成的 index.md 书单页面放进去,然后在源代码的第 8 和 14 行可以自行修改跳转链接。我这里是在 book 文件夹中又新建了一个文件夹然后又创建了该书的目录页面,所以可以直接跳转。
1 <a href ="无职转生/无职转生.html" target ="_Blank" class ="book-container" > </a >
为了使得每个章节都能打开和收起功能而且第一章默认打开,又自行添加了一个 script,而且目录中也可以直接跳转到每一小节的内容,只要在该 book 文件夹中加入相应的 html 文件就行。下面是该页面的部分代码,仅供参考。
1 2 3 4 5 6 7 8 9 10 11 12 13 14 15 16 17 18 19 20 21 22 23 24 25 26 27 28 29 30 31 32 33 34 35 36 37 38 39 40 41 42 43 44 45 46 47 48 49 50 51 52 53 54 55 56 57 58 59 60 61 62 63 64 65 <!DOCTYPE html > <html > <head > <meta charset ="UTF-8" /> <title > 小说目录</title > <style > .section { display : none ; } </style > </head > <body > <h1 > 无职转生</h1 > <h2 > 目录</h2 > <ul id ="chapter-list" > <li > <span class ="toggle" onclick ="toggleSection('chapter1')" > [-]</span > <a href ="chapter2.html" > 第一章 幼年期</a > <ul id ="chapter1" class ="section" > <li > <a href ="chapter3.html" > 序章</a > </li > <li > <a href ="chapter4.html" > 第一话 难道是:异世界</a > </li > <li > <a href ="chapter5.html" > 第二话 感到退缩的女仆</a > </li > <li > <a href ="chapter6.html" > 第三话 魔法课本</a > </li > <li > <a href ="chapter7.html" > 第四话 师傅</a > </li > <li > <a href ="chapter8.html" > 第五话 剑术与魔法</a > </li > <li > <a href ="chapter9.html" > 第六话 尊敬的理由</a > </li > <li > <a href ="chapter10.html" > 第七话 朋友</a > </li > <li > <a href ="chapter11.html" > 第八话 迟钝</a > </li > <li > <a href ="chapter12.html" > 第九话 紧急家族会议</a > </li > <li > <a href ="chapter13.html" > 第十话 瓶颈</a > </li > <li > <a href ="chapter14.html" > 第十一话 离别</a > </li > <li > <a href ="chapter15.html" > 番外 格瑞拉特家的母亲</a > </li > <li > <a href ="chapter16.html" > 文库特典 人生的绿洲</a > </li > </ul > </li > </ul > <script > function toggleSection (sectionId) var section = document .getElementById(sectionId); if (section.style.display === "none" || section.style.display === "" ) { section.style.display = "block" ; document .querySelector("#chapter-list li span.toggle" ).textContent = "[-]" ; } else { section.style.display = "none" ; document .querySelector("#chapter-list li span.toggle" ).textContent = "[+]" ; } } var chapters = document .querySelectorAll("#chapter-list li ul.section" ); for (var i = 0 ; i < chapters.length; i++) { if (chapters[i].children.length > 5) { chapters[i].style.display = "block" ; chapters[i].previousElementSibling.querySelector( ".toggle" ).textContent = "[-]" ; } } </script > </body > </html >
预览效果
最后 hexo 三连之后就可以预览效果啦
下面是目录的预览
考虑到 html 的页面需要每次都上传到服务器,而且久而久之会拖慢预览和上传的速度,已经将具体的书页托管到 netlify 然后链接到对应页面即可进行阅读。